Introduction
This is a continuation from Part 1.
Prerequisites
To get started with testing, first install the following package:
yarn add @testing-library/react-hooks faker@5.5.3 @types/faker@5.5.9
So @testing-library/react-hooks allows us to create a simple test harness for React hooks that handles running them within the body of a function component, as well as providing various useful utility functions for updating the inputs and retrieving the outputs of our custom hook. This library aims to provide a testing experience as close as possible to natively using your hook from within a real component. While faker helps us generate massive amounts of fake (but realistic) data for testing.
Write tests for SwiperItem.tsx
For test files, I like to separate them in a folder so that it's less cluttered when viewing the main files. Now, create a new folder named __tests__ under the src/components. This is where we will put the test files for the components under src/components.
Alright, the first component we would be writing test for is SwiperItem.tsx. Create a file under src/components/__tests__ and name it SwiperItem.test.tsx.
Then let's add in the structure of the test:
import SwiperItem, { Props } from '../SwiperItem';

describe('<SwiperItem />', () => {});
Aside from importing the component that we will test, we also imported the type Props. You'll get to see later why.
describe is one of Jest's global functions, so with the setup of Create React App, we don't need to specifically import these global functions in our code, we can just directly use them. describe creates a block that groups together several related tests. So ideally the description should be describing what we are testing, for this case I used the component name. Feel free to rename it according to your preference.
Next we can add a test case inside the describe block:
import SwiperItem, { Props } from '../SwiperItem';

describe('<SwiperItem />', () => {
  it('should accept imageSrc and imageAlt props', () => {});
});
Another global function by Jest, it (or test) method runs a test. This is where we can have different test cases. Let's write our first test case:
import { render, screen } from '@testing-library/react';
import faker from 'faker';
import SwiperItem, { Props } from '../SwiperItem';

describe('<SwiperItem />', () => {
  const renderComponent = (props: Props) => render(<SwiperItem {...props} />);

  it('should accept imageSrc and imageAlt props', () => {
    const imageSrc = faker.image.imageUrl();
    const imageAlt = faker.lorem.sentence();

    renderComponent({ imageSrc, imageAlt });

    const imageEl = screen.queryByAltText(imageAlt);

    expect(imageEl).toHaveAttribute('src', imageSrc);
  });
});
Okay don't panic! I'll explain the added code one by one. So first, I created a reusable function renderComponent inside the describe block, it accepts the props of our component as an argument and calls the render() method from Testing Library to render our component with the passed props in a test environment. Since our test files are also in TypeScript, we still need to define the type it, that's why we imported the type Props here too. To learn more about the render() method, you can go here. Then inside the it block, we generated a random image source and alternative text using faker library which we installed earlier. We then pass these as props to our SwiperItem component. After that, we can do our checks to validate that the image is rendered. To do that, we did a query by its alternative text using another method of Testing Library which is screen.queryByAltText(). To know all the possible queries you can do with screen, you can go here. Then finally using one of Jest's global functions, we can call the expect() method and pass the element returned by the query, and run what we call a matcher method .toHaveAttribute(), it can accept two arguments, first argument being the element attribute that you want to check and second argument is what the attribute value should match. This is one of the many custom matcher methods provided by the library called jest-dom which are specific to the DOM. While you can check this documentation for the more generic matcher methods.
Alright, I hoped that explained it.
To verify if this test case did pass or not, in your terminal, run the following command:
yarn test --coverage
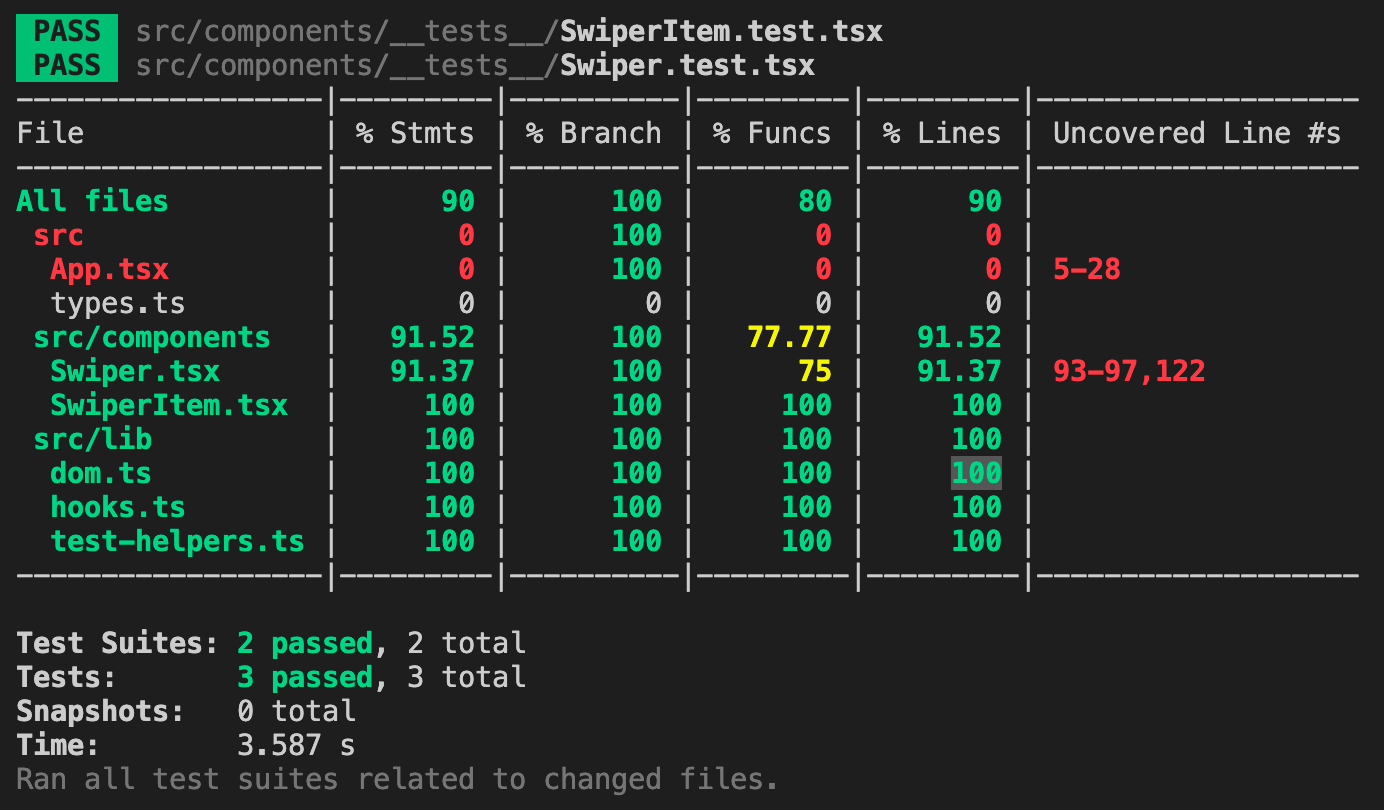
The --coverage parameter will show you which how many percentage you have covered in each files of your project and/or if you have missed any line to test. Once the changes are saved and the command ran successfully, the terminal should display something like this:
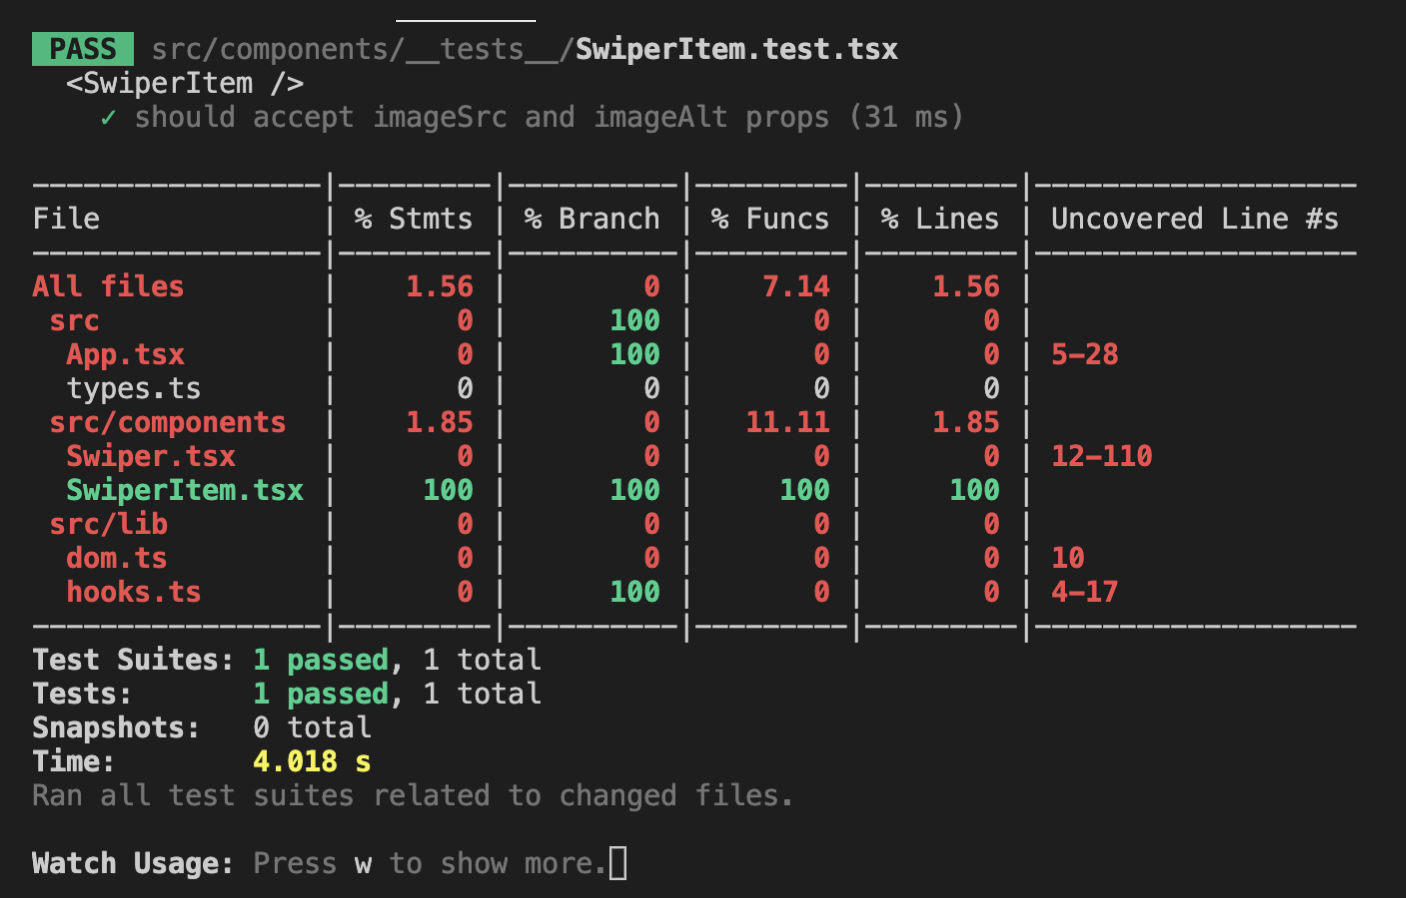
Cool, first test and we immediately hit 100% for SwiperItem.tsx! I can't promise the same for Swiper.tsx though, that will have many test cases but would be good for our learning. Alright, let's move on.
Write tests for Swiper.tsx
Before we start writing test for Swiper.tsx, please make sure the contents of your Swiper.tsx is the same as mine, since we added quite a bit of code over there, there's a high possibility we have some difference. To ensure we are looking at the same lines of code when dealing with uncovered lines upon writing tests, please copy the code below:
import React, { useState, useRef } from 'react';
import { getRefValue, useStateRef } from '../lib/hooks';
import { getTouchEventData } from '../lib/dom';
import { SwiperItemType } from '../types';
import SwiperItem from './SwiperItem';

import './Swiper.css';

export type Props = {
  items: Array<SwiperItemType>;
};

const MIN_SWIPE_REQUIRED = 40;

function Swiper({ items }: Props) {
  const containerRef = useRef<HTMLUListElement>(null);
  const containerWidthRef = useRef(0);
  const minOffsetXRef = useRef(0);
  const currentOffsetXRef = useRef(0);
  const startXRef = useRef(0);
  const [offsetX, setOffsetX, offsetXRef] = useStateRef(0);
  const [isSwiping, setIsSwiping] = useState(false);
  const [currentIdx, setCurrentIdx] = useState(0);

  const onTouchMove = (e: TouchEvent | MouseEvent) => {
    const currentX = getTouchEventData(e).clientX;
    const diff = getRefValue(startXRef) - currentX;
    let newOffsetX = getRefValue(currentOffsetXRef) - diff;

    const maxOffsetX = 0;
    const minOffsetX = getRefValue(minOffsetXRef);

    if (newOffsetX > maxOffsetX) {
      newOffsetX = maxOffsetX;
    }

    if (newOffsetX < minOffsetX) {
      newOffsetX = minOffsetX;
    }

    setOffsetX(newOffsetX);
  };
  const onTouchEnd = () => {
    const currentOffsetX = getRefValue(currentOffsetXRef);
    const containerWidth = getRefValue(containerWidthRef);
    let newOffsetX = getRefValue(offsetXRef);

    const diff = currentOffsetX - newOffsetX;

    // we need to check difference in absolute/positive value (if diff is more than 40px)
    if (Math.abs(diff) > MIN_SWIPE_REQUIRED) {
      if (diff > 0) {
        // swipe to the right if diff is positive
        newOffsetX = Math.floor(newOffsetX / containerWidth) * containerWidth;
      } else {
        // swipe to the left if diff is negative
        newOffsetX = Math.ceil(newOffsetX / containerWidth) * containerWidth;
      }
    } else {
      // remain in the current image
      newOffsetX = Math.round(newOffsetX / containerWidth) * containerWidth;
    }

    setIsSwiping(false);
    setOffsetX(newOffsetX);
    setCurrentIdx(Math.abs(newOffsetX / containerWidth));

    window.removeEventListener('touchend', onTouchEnd);
    window.removeEventListener('touchmove', onTouchMove);
    window.removeEventListener('mouseup', onTouchEnd);
    window.removeEventListener('mousemove', onTouchMove);
  };
  const onTouchStart = (
    e: React.TouchEvent<HTMLDivElement> | React.MouseEvent<HTMLDivElement>
  ) => {
    setIsSwiping(true);

    currentOffsetXRef.current = getRefValue(offsetXRef);
    startXRef.current = getTouchEventData(e).clientX;

    const containerEl = getRefValue(containerRef);
    const containerWidth = containerEl.offsetWidth;

    containerWidthRef.current = containerWidth;
    minOffsetXRef.current = containerWidth - containerEl.scrollWidth;

    window.addEventListener('touchmove', onTouchMove);
    window.addEventListener('touchend', onTouchEnd);
    window.addEventListener('mousemove', onTouchMove);
    window.addEventListener('mouseup', onTouchEnd);
  };
  const indicatorOnClick = (idx: number) => {
    const containerEl = getRefValue(containerRef);
    const containerWidth = containerEl.offsetWidth;

    setCurrentIdx(idx);
    setOffsetX(-(containerWidth * idx));
  };

  return (
    <div
      className="swiper-container"
      onTouchStart={onTouchStart}
      onMouseDown={onTouchStart}
    >
      <ul
        ref={containerRef}
        className={`swiper-list ${isSwiping ? 'is-swiping' : ''}`}
        style={{ transform: `translate3d(${offsetX}px, 0, 0)` }}
      >
        {items.map((item, idx) => (
          <SwiperItem key={idx} {...item} />
        ))}
      </ul>
      <ul className="swiper-indicator">
        {items.map((_item, idx) => (
          <li
            key={idx}
            className={`swiper-indicator-item ${
              currentIdx === idx ? 'active' : ''
            }`}
            onClick={() => indicatorOnClick(idx)}
            data-testid="indicator"
          />
        ))}
      </ul>
    </div>
  );
}

export default Swiper;
Alright, don't forget to save the changes!
Create the file - src/components/__tests__/Swiper.test.tsx and let's add the first test case for it which just checks whether the images are rendered:
import { render, screen } from '@testing-library/react';
import faker from 'faker';
import Swiper, { Props } from '../Swiper';

describe('<Swiper />', () => {
  const renderComponent = (props: Props) => render(<Swiper {...props} />);
  const createRandomItems = (count = 3) => {
    const items = [];

    for (let i = 0; i < count; i++) {
      items.push({
        imageSrc: faker.image.imageUrl(),
        imageAlt: faker.lorem.sentence(),
      });
    }

    return items;
  };

  it('should display the images', () => {
    const items = createRandomItems();

    renderComponent({ items });

    items.forEach((item) => {
      const imageEl = screen.queryByAltText(item.imageAlt);

      expect(imageEl).toHaveAttribute('src', item.imageSrc);
    });
  });
});
Most of the code here should be familiar to you based from our test case for SwiperItem component. The main difference is that I created a reusable function to produce 3 image items to pass as props for our Swiper component. I think 3 is enough but feel free to adjust the number of items if you like. After rendering the component, I then loop through the items and query them one by one using screen.queryByAltText() with their alternative text, then call the expect() method to check whether the image is rendered with the correct image source using .toHaveAttribute(), similar to what we did in SwiperItem component.
Alright, save the changes above and check your terminal, it should look something like this:
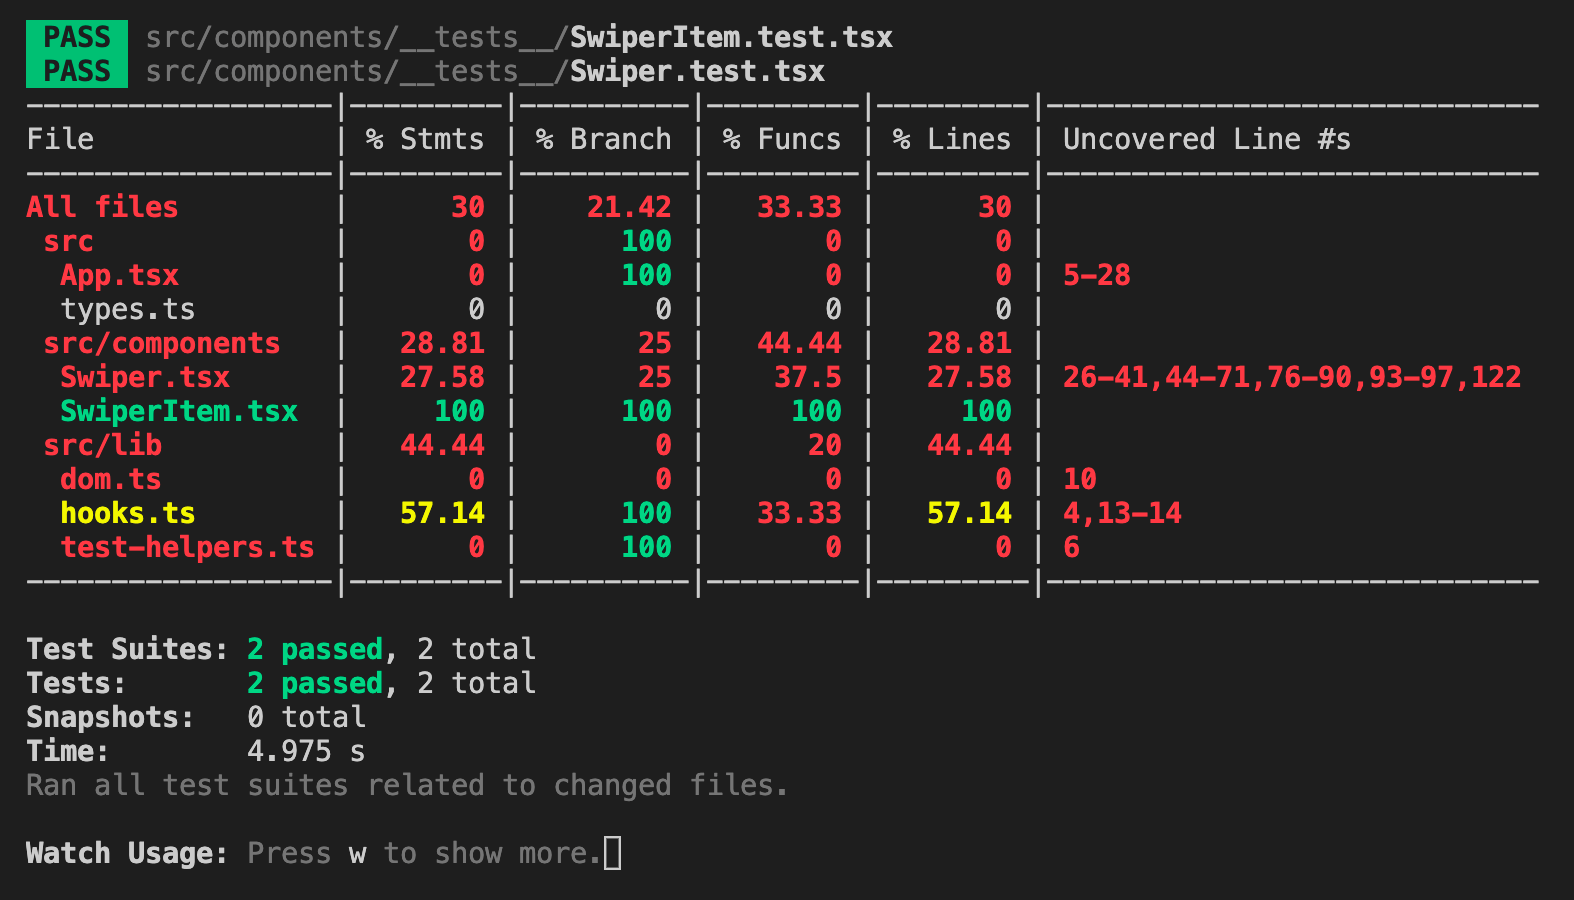
From the screenshot, there's still a few lines uncovered in our Swiper component, lines 26 - 41, 44 - 71, 76 - 90, 93 - 97 and 122. If you go and check these lines in Swiper.tsx file, majority of these are from the swipe logic. Let's cover that in our next test case. It would be slightly more complicated, we need to verify that our swipe logic works when we fire mouse or touch events.
Before we move into writing the code for the test case. We need to create a helper function for this test case. Let me explain why we need so. In a test environment, when you try to access an element property values such as offsetWidth and scrollHeight it will return you 0. That's because these values are computed in a browser environment with a dependency on the CSS styles. Our test case in verifying the swipe logic would fail because it depends on these values. We need to change the value of these properties from 0 to any number we would want or expect. It could have been easy though if we can just do something like this element.offsetWidth = 123 but because these values are read-only, we cannot simply do that. So here's where my helper function comes in to the rescue, create a file src/lib/test-helpers.ts and add the following code:
export function setReadOnlyProperty<
  O extends Record<string, any>,
  K extends keyof O,
  V extends any
>(object: O, property: K, value: V) {
  Object.defineProperty(object, property, {
    value,
    configurable: true,
  });
}
If you're new to TypeScript, you already know Generics from when we created the getRefValue but you might be new to extends and keyof. Just like a Classes in JavaScript, you can also extend types. While keyof type operator takes an object type and produces a string or numeric literal union of its keys. In combination with Generics, I can then extend O and expect it to be an object (Record<string, any>), then extend K to be a key (or property) of O, while V could be any which literally means it could be anything. With this type definition, when you use the function pass an object and a key, the key you have given must exist in the object, otherwise TypeScript would complain.
Alright. Then let's write the code for our next test case, render the component and override the list element that contains the images:
...
import { setReadOnlyProperty } from '../../lib/test-helpers';

  ...

  it('should swipe items on mouse move', () => {
    const items = createRandomItems();

    renderComponent({ items });

    const containerWidth = faker.datatype.number({ min: 1 });
    const containerScrollWidth = containerWidth * items.length;

    const listEl = screen.queryAllByRole('list')[0];

    // override list element's read-only properties
    setReadOnlyProperty(listEl, 'offsetWidth', containerWidth);
    setReadOnlyProperty(listEl, 'scrollWidth', containerScrollWidth);
  });
...
Here, we generated a random number using faker for the containerWidth (note that it should be minimum of 1 to make our test case reliable) then multiplied it by the number of images we have for the containerScrollWidth.
Then, we used screen.queryAllByRole() to query an array of elements that has a role of list, elements declared as <ul> automatically gets an role of list. We couldn't use screen.queryByRole() because we have another <ul> which is the list element that contains our indicators. In case you need it, you can check ther list of roles you could use for this query other than list for your future test cases.
After getting the list element, we then override its offsetWidth and containerScrollWidth.
We can now call some expect() method to verify a few things:
- It should display first image by default (
offsetX==0) - Then do a mouse drag (fire events,
differenceofx>40) - It should display second image (
offsetX==(negative) containerWidth)
To write that in code, see below:
...
import { fireEvent, render, screen } from '@testing-library/react';

  ...

  it('should swipe items on mouse move', () => {
    ...

    // verify start position is 0
    expect(listEl).toHaveStyle({
      transform: 'translate3d(0px, 0, 0)',
    });

    let startX = 0;
    let endX = -41;

    fireEvent.mouseDown(listEl, { clientX: startX });
    fireEvent.mouseMove(listEl, { clientX: endX });
    fireEvent.mouseUp(listEl);

    // verify should move to the left
    expect(listEl).toHaveStyle({
      transform: `translate3d(${-containerWidth}px, 0, 0)`,
    });
  });
...
We verify that the starting offsetX position should be 0. We can use .toHaveStyle() matcher method which accepts an object that contains the style property and value we want to expect or verify.
We trigger the mouse events in the correct chronological order, we defined the starting x position, for simplicity, we can just define it as 0 and set the ending x position which should be negative (since we're moving from right to left) and difference should be more than 40 (based from MIN_SWIPE_REQUIRED) in order for it to auto-swipe to the next image. To fire mouse events in a test environment, we can use fireEvent which is also from Testing Library. To fire other DOM events, you can check out the documentation. First argument it accepts is the element you want the event to get fired to while optionally, you can pass a second argument to provide event data or details related to the event such as clientX which what I did above. After the mouseUp event is fired, we then verify that the the list element containing our images is displaying the second image.
Save the changes above and let's check our terminal to see if it passed:
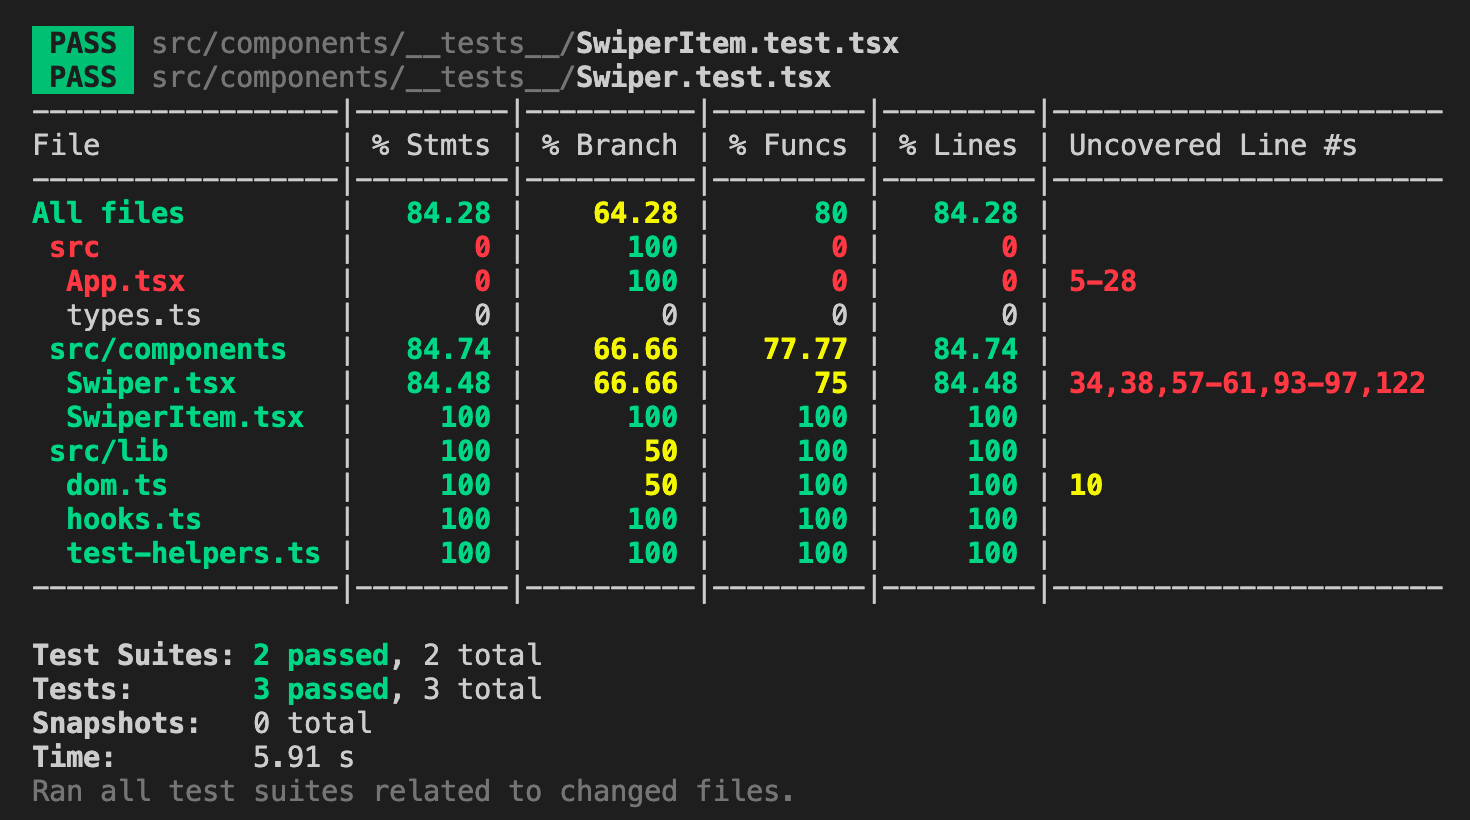
And yes it did, it also reduced the uncovered lines. We still have a few uncovered lines to cover. Let's cover line 57 which is swiping from left to right.
Okay. Normally I would create another test case for this because we should try not to have a lot of expect functions called in a single test case, that reduces the complexity of a test case, but I think this is a reasonable special case since after we move from right to the left, we should be able to go back from left to the right without duplicating too much code in our test files.
So just right below the previous code we worked on, add the following code:
...

  it('should swipe items on mouse move', () => {

    ...

    // verify should move to the right
    startX = 0;
    endX = 41;

    fireEvent.mouseDown(listEl, { clientX: startX });
    fireEvent.mouseMove(listEl, { clientX: endX });
    fireEvent.mouseUp(listEl);

    expect(listEl).toHaveStyle({
      transform: `translate3d(0px, 0, 0)`,
    });
  });
...
The current test case should still pass once we save the changes and if we check our terminal, our uncovered lines further reduces:

Alright. Let's move on to cover line 61 which is not to auto-swipe to the next or previous image if the x offset difference is less than or equal to 40. Add the following code below in the same test case:
...

  it('should swipe items on mouse move', () => {

    ...

    // verify should stay in position if less than minimum move
    startX = 0;
    endX = -faker.datatype.number({ min: 0, max: 40 });

    fireEvent.mouseDown(listEl, { clientX: startX });
    fireEvent.mouseMove(listEl, { clientX: endX });
    fireEvent.mouseUp(listEl);

    expect(listEl).toHaveStyle({
      transform: `translate3d(0px, 0, 0)`,
    });
  });
...
Here I used faker to generate a random number from 0 to 40 for the ending x position. The current offsetX of our list element is at 0 and after firing the mouse events that will drag less than 40 in difference, we will expect that the offsetX should still be at 0. In case you might missed it, I added a negative sign (-) before the random number it as we're trying to move the images to the left so it should be of negative value.
Once you saved the changes, your terminal should display something like this:
Pass again! We're almost there. Let's try to cover two lines this time, which is 34 and 38. These two lines cover the logic of preventing our Swiper component from swiping if it's already at both ends. Currently the position of the list element is displaying the first image, it should not allow to swipe from left to the right since there's already no image to display before our first image. Respectively, if we swipe from right all the way to the left, it will stop at the last image. Here's the following code for that:
...

  it('should swipe items on mouse move', () => {

    ...

    // verify shouldn't move further right if already at the start
    startX = 0;
    endX = 1;

    fireEvent.mouseDown(listEl, { clientX: startX });
    fireEvent.mouseMove(listEl, { clientX: endX });
    fireEvent.mouseUp(listEl);

    expect(listEl).toHaveStyle({
      transform: `translate3d(0px, 0, 0)`,
    });

    // calculate the offset needed to show the last image
    const minOffsetX = containerScrollWidth - containerWidth;

    // verify shouldn't move further left if already at the end
    startX = 0;
    endX = -(minOffsetX + 1);

    fireEvent.mouseDown(listEl, { clientX: startX });
    fireEvent.mouseMove(listEl, { clientX: endX });
    fireEvent.mouseUp(listEl);

    expect(listEl).toHaveStyle({
      transform: `translate3d(${-minOffsetX}px, 0, 0)`,
    });
  });
});
...
Save the changes and let's look at our current test coverage:
We're left with lines 93 - 97 and 122 which are the logic when clicking one of the indicators. Before that, I just want to remind you we only covered mouse events, but I still have the touch events. I'm not sure why Jest is not displaying line 103 as uncovered though. Anyway, they work very similarly hence, we can just copy the codes from our second test case - should swipe items on mouse move, create a new test case - should swipe items on touch move, paste the copied codes and simply replace the fired events like this:
  ...

  it('should swipe items on touch move', () => {
    const items = createRandomItems();

    renderComponent({ items });

    const containerWidth = faker.datatype.number({ min: 1 });
    const containerScrollWidth = containerWidth * items.length;

    const listEl = screen.queryAllByRole('list')[0];

    // override list element's read-only properties
    setReadOnlyProperty(listEl, 'offsetWidth', containerWidth);
    setReadOnlyProperty(listEl, 'scrollWidth', containerScrollWidth);

    // verify start position is 0
    expect(listEl).toHaveStyle({
      transform: 'translate3d(0px, 0, 0)',
    });

    // verify should move to the left
    let startX = 0;
    let endX = -41;

    fireEvent.touchStart(listEl, { changedTouches: [{ clientX: startX }] });
    fireEvent.touchMove(listEl, { changedTouches: [{ clientX: endX }] });
    fireEvent.touchEnd(listEl);

    expect(listEl).toHaveStyle({
      transform: `translate3d(${-containerWidth}px, 0, 0)`,
    });

    // verify should move to the right
    startX = 0;
    endX = 41;

    fireEvent.touchStart(listEl, { changedTouches: [{ clientX: startX }] });
    fireEvent.touchMove(listEl, { changedTouches: [{ clientX: endX }] });
    fireEvent.touchEnd(listEl);

    expect(listEl).toHaveStyle({
      transform: `translate3d(0px, 0, 0)`,
    });

    // verify should stay in position if less than minimum move
    startX = 0;
    endX = faker.datatype.number({ min: 0, max: 40 });

    fireEvent.touchStart(listEl, { changedTouches: [{ clientX: startX }] });
    fireEvent.touchMove(listEl, { changedTouches: [{ clientX: endX }] });
    fireEvent.touchEnd(listEl);

    expect(listEl).toHaveStyle({
      transform: `translate3d(0px, 0, 0)`,
    });

    // verify shouldn't move further right if already at the start
    startX = 0;
    endX = 1;

    fireEvent.touchStart(listEl, { changedTouches: [{ clientX: startX }] });
    fireEvent.touchMove(listEl, { changedTouches: [{ clientX: endX }] });
    fireEvent.touchEnd(listEl);

    expect(listEl).toHaveStyle({
      transform: `translate3d(0px, 0, 0)`,
    });

    // verify shouldn't move further left if already at the end
    const minOffsetX = containerScrollWidth - containerWidth;

    startX = 0;
    endX = -(minOffsetX + 1);

    fireEvent.touchStart(listEl, { changedTouches: [{ clientX: startX }] });
    fireEvent.touchMove(listEl, { changedTouches: [{ clientX: endX }] });
    fireEvent.touchEnd(listEl);

    expect(listEl).toHaveStyle({
      transform: `translate3d(${-minOffsetX}px, 0, 0)`,
    });
  });
...
And once you save the changes, our new test case would also pass.
Cool! We're at our last test case for our Swiper component, let's start by copying the top part of our previous test case since we can reuse that:
  ...

  it('should swipe items on indicator click', () => {
    const items = createRandomItems();

    renderComponent({ items });

    const containerWidth = faker.datatype.number({ min: 1 });
    const containerScrollWidth = containerWidth * items.length;

    const listEl = screen.queryAllByRole('list')[0];

    // override list element's read-only properties
    setReadOnlyProperty(listEl, 'offsetWidth', containerWidth);
    setReadOnlyProperty(listEl, 'scrollWidth', containerScrollWidth);

    // verify start position is 0
    expect(listEl).toHaveStyle({
      transform: 'translate3d(0px, 0, 0)',
    });
  });
...
Next, let's verify that the current "active" indicator is the first indicator since we are initially displaying the first image. We determine an indicator is active by adding an active class into it. To do that, we can use another matcher function .toHaveClass() from the Testing Library. But first, how do we query for the first indicator? We can't simply use screen.queryAllByRole('listitem') because it would return the images with it. Remember we added an attribute to our indicator, this one data-testid="indicator"? Yes, with that attribute, we can use the query screen.queryAllByTestId('indicator') and that would return an array of the indicator list items. To write it in code, it would be like this:
  ...

  it('should swipe items on indicator click', () => {
    ...

    const firstIndicatorEl = screen.queryAllByTestId('indicator')[0];

    // verify first indicator item has an "active" class
    expect(firstIndicatorEl).toHaveClass('active');
  });
...
Yes, that's how simple it is!
Now, we need to verify that once we click on the second indicator, it should display the second image. But before that, let's first verify the second indicator is not "active" with the following code:
  ...

  it('should swipe items on indicator click', () => {

    ...

    const secondIndicatorEl = screen.queryAllByTestId('indicator')[1];

    expect(secondIndicatorEl).not.toHaveClass('active');
  });
...
Lastly, let's trigger a mouse click event and verify that the list element containing our images move from right to the left and also verify that the new "active" indicator is the second. Here's the code for that:
  ...

  it('should swipe items on indicator click', () => {

    ...

    fireEvent.click(secondIndicatorEl);

    // verify should move to the left
    expect(listEl).toHaveStyle({
      transform: `translate3d(${-containerWidth}px, 0, 0)`,
    });

    // verify second indicator item has an "active" class
    expect(secondIndicatorEl).toHaveClass('active');
    expect(firstIndicatorEl).not.toHaveClass('active');
  });
...
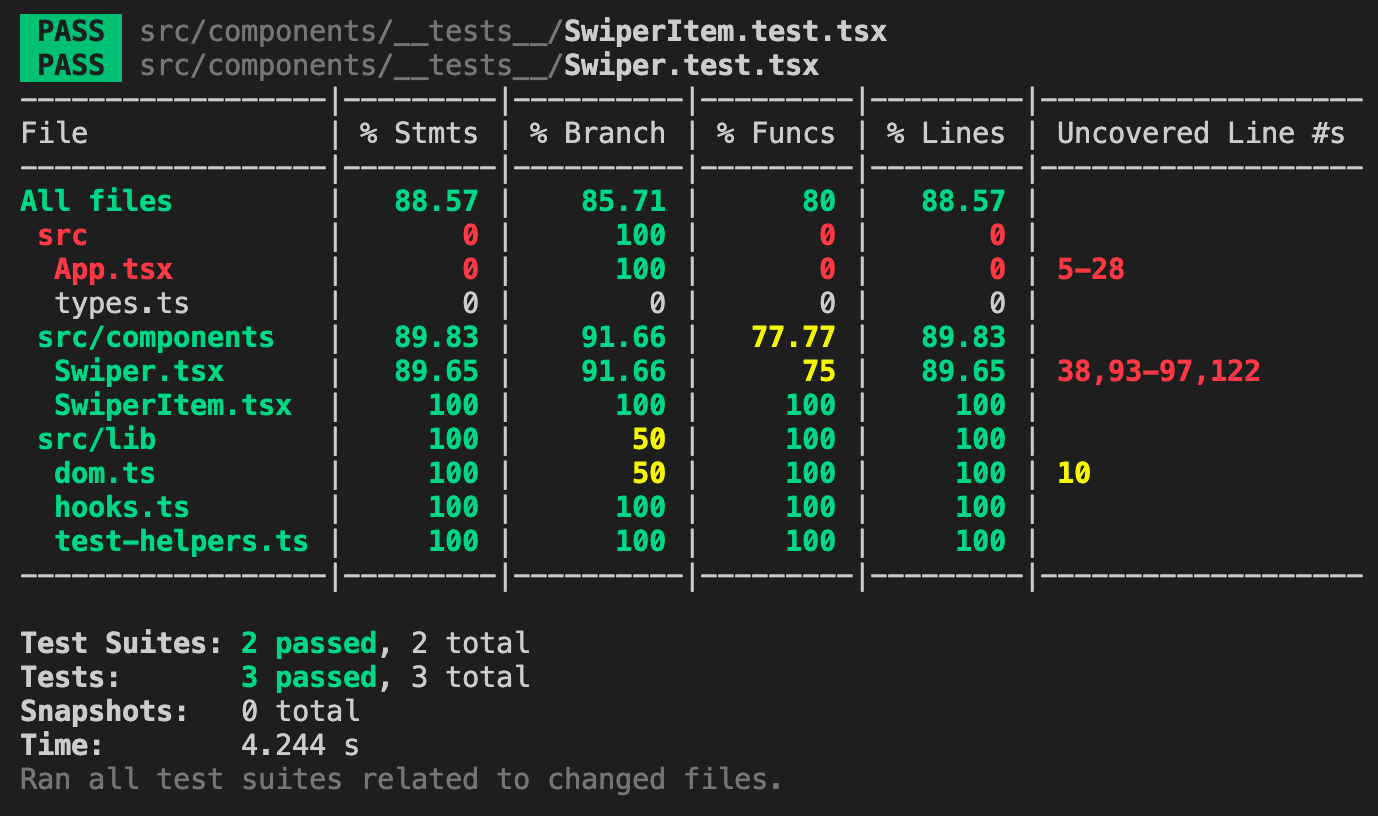
Now once you save the changes, we should be able to achieve 100% coverage with our Swiper component:
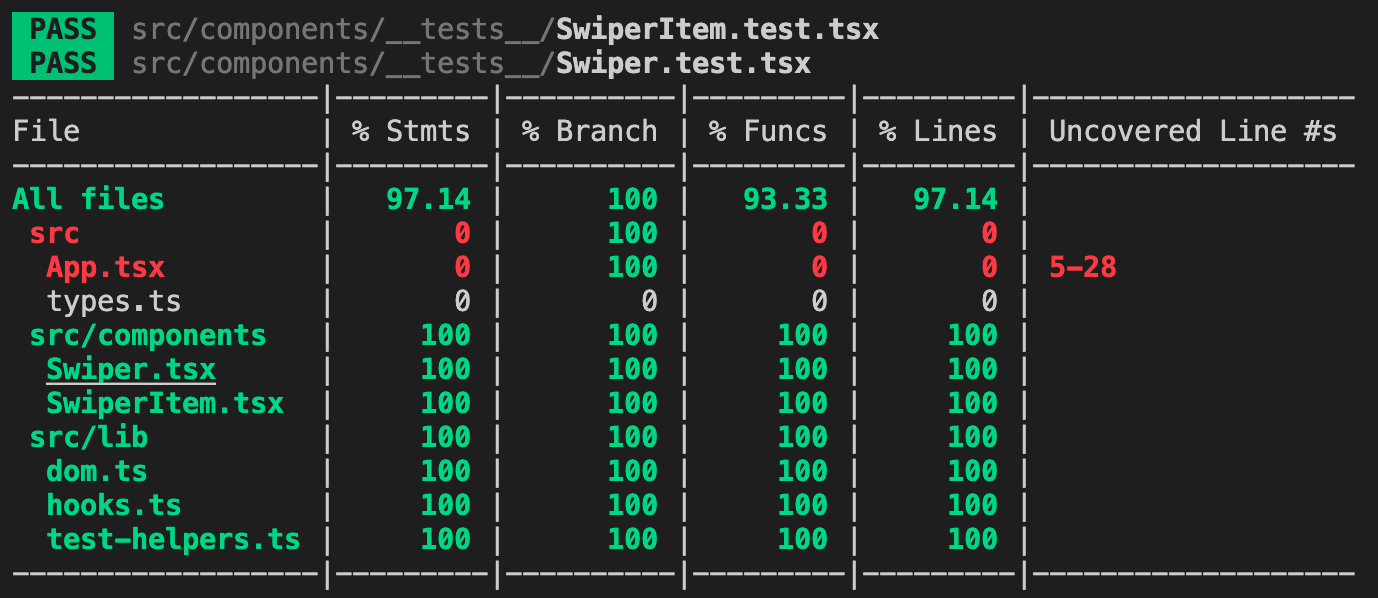
Awesome! And we're done! You've just built your own swiper in React and TypeScript with tests! I hope you've learned a lot from this post, especially those who are new to TypeScript and Jest.
In case you need the final code of the swiper as a reference, this is the link to the GitHub repository.
Please don't forget to share this post and just a heads up, I'll be writing more of these "building your own components in React and TypeScript with tests" so if you're interested, you can come back to my blog to check it out once they're published.