Introduction
This is a continuation from Part 1.
Prerequisites
To get started with testing, first install the package below:
yarn add @faker-js/faker
@faker-js/faker helps us generate massive amounts of fake (but realistic) data for testing. Check out the guide for faker here.
Write tests for BarItem component
Before we go ahead with creating the test file for the BarItem component, let's first add the data-testid attributes to help us query the elements in the component later. Open src/components/BarItem.tsx and update the code with the following:
...
export default function BarItem(props: Props) {
  return (
    <div
      className={cn('bar-item', { 'is-negative': props.isNegative })}
      data-testid="bar-item"
    >
      <div
        ...
        data-testid="bar-item-main"
      />
      <div
        ...
        data-testid="bar-item-offset"
      />
      <div className="bar-item-legend" data-testid="bar-item-legend">
        {props.legend}
      </div>
    </div>
  );
}
Alright, we're ready to start writing some tests. For test files, I like to separate them in a folder so that it's less cluttered when viewing the main files. Create a new folder named __tests__ under the src/components folder. This is where we will put the test files for the components we have. For our first test case, we can start with the BarItem component. Create a file under the src/components/__tests__ folder and name it BarItem.test.tsx. The path for this new file should be src/components/__tests__/BarItem.test.tsx. This is a common naming convention for test files, make sure it matches the file name that you are testing then add infix .test for the test file name.
Now let's add in the initial structure of the test file:
import BarItem, { Props } from '../BarItem';

describe('BarItem component', () => {});
Aside from importing the component that we will test, we also imported the type Props. You'll get to know why we did that later on.
In your test files, Jest puts functions and objects into the global environment. describe is one of the functions available globally, so with the setup of Create React App, we don't need to require or import anything to use them. describe creates a block that groups together several related tests. So ideally the description should be explaining what we are testing, so this is why I put 'BarItem component'. Feel free to rename the description according to your preference if you feel that there's a better description of what we are testing.
Next we can add a test case inside the describe block:
import BarItem, { Props } from '../BarItem';

describe('BarItem component', () => {
  it('should render a bar with positive values', () => {});
});
The it (or test) method is another global function by Jest that runs a test.
Let's start to write some code for the first test case. First, you want to create a reusable function called renderComponent inside the describe block, it should accept the props (or properties) of our component as an argument and call the render() method from Testing Library to render our component with the passed props in a test environment.
import { render } from '@testing-library/react';
import BarItem, { Props } from '../BarItem';

describe('<BarItem />', () => {
  const renderComponent = (props: Props) => render(<BarItem {...props} />);

  it('should render a bar with positive values', () => {});
});
Since we'll have more than one test case for this component, creating a reusable function to render the component will reduce the code duplication. This will also make it easier if ever next time you have to rename your component, we can just change it within these lines and not in multiple separate lines.
Before we can render our component using the reusable function, we need to provide the required props for it. This is where we can use faker to generate random data for us. This makes our test more trustable and reliable instead of hardcoding the values.
Here's the code we need to add inside our first test case in src/components/__tests__/BarItem.test.tsx:
...
describe('<BarItem />', () => {
  ...
  it('should render a bar with positive values', () => {
    const legend = faker.lorem.sentence();
    const barPercent = faker.datatype.number({ min: 0, max: 100 });
    const barPercentage = `${barPercent}%`;
    const risePercent = faker.datatype.number({ min: 0, max: barPercent });
    const risePercentage = `${risePercent}%`;

    renderComponent({
      legend,
      barPercentage,
      risePercentage,
      isNegative: false,
    });
  });
});
So now that our component has been rendered, we need to verify if the props we passed have been received from the component and render the component as expected. To do that, let's first query for our main element which is the bar-item. It is advisable to use screen methods from the Testing Library, and in our case we can use .queryByTestId('bar-item'), which returns the bar-item element based on its data-testid attribute. To learn more about queries in the Testing Library, you can read more about them here.
...
describe('<BarItem />', () => {
  ...
  it('should render a bar with positive values', () => {
    ...

    renderComponent({
      ...
    });

    const barItemEl = screen.queryByTestId('bar-item');
  });
});
Now that we have the element, what do we do with it? We can do the checks by executing one of Jest's global functions called the expect() method and pass the element returned from our query. Next is to run what we call a matcher method .toHaveClass() which checks if the class attribute value of the element is equal to the argument passed. This is one of the matcher methods provided by Jest. You can check this documentation for the other custom matcher methods which are specific to the DOM.
Remember that in our props, we are passing the value for isNegative as false. Hence, we do not expect our bar-item element to have the is-negative in the class. We can use the .not.toHaveClass() instead which is the reverse check of .toHaveClass(). Here's the code we need to add in our test case:
...
describe('<BarItem />', () => {
  ...
  it('should render a bar with positive values', () => {
    ...
    const barItemEl = screen.queryByTestId('bar-item');

    expect(barItemEl).not.toHaveClass('is-negative');
  });
});
Now save your changes and let's verify if this test case will pass or not. In your terminal, run the script command available in package.json to run the tests:
yarn test --coverage
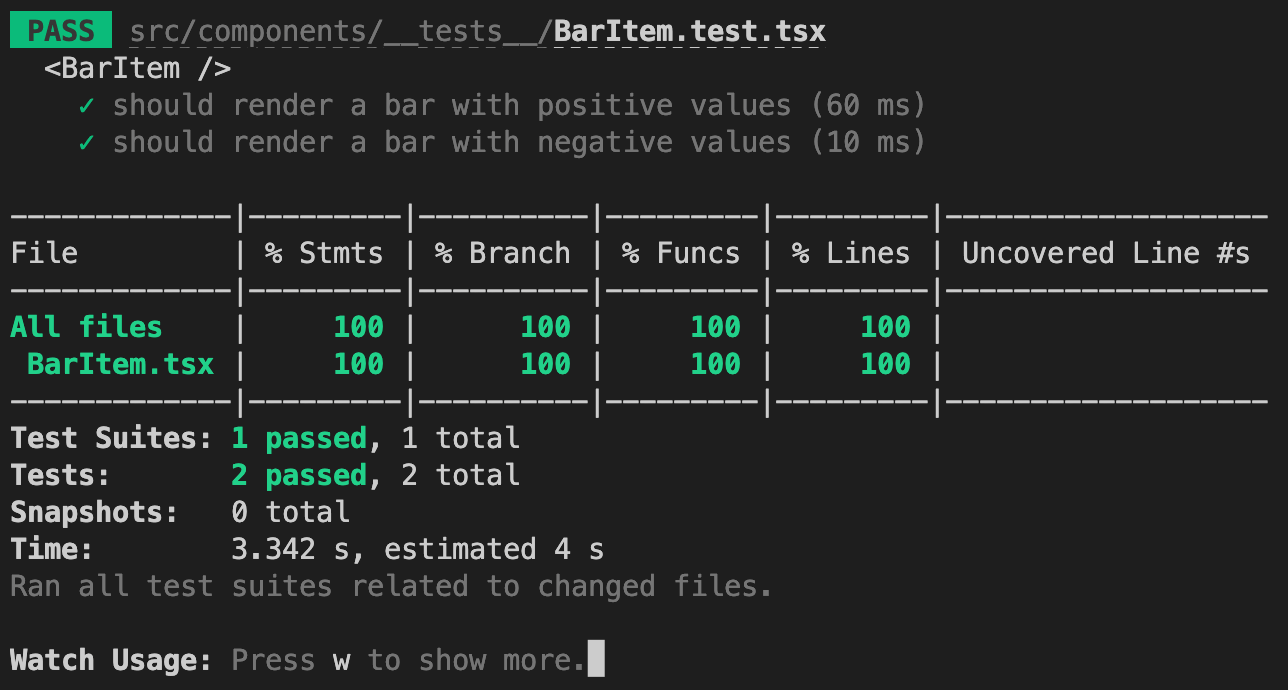
The --coverage parameter will show you how many percent you have covered in each file of your project and/or if you have missed any lines to test. Once the command ran successfully, the terminal should display something like this:

Alright our very first test case passed! We easily achieved 100% test coverage because there's no conditional statements in the component. Let's complete this test case by adding the rest of the checks:
...
describe('<BarItem />', () => {
  ...
  it('should render a bar with positive values', () => {
    ...
    const barItemEl = screen.queryByTestId('bar-item');
    const barMainEl = screen.queryByTestId('bar-item-main');
    const barOffsetEl = screen.queryByTestId('bar-item-offset');
    const barLegendEl = screen.queryByTestId('bar-item-legend');

    expect(barItemEl).not.toHaveClass('is-negative');
    expect(barMainEl).toHaveStyle({ height: barPercentage });
    expect(barOffsetEl).toHaveStyle({ height: risePercentage });
    expect(barLegendEl).toHaveTextContent(legend);
  });
});
Once the changes are saved, it should still pass. We've completed all the necessary checks based on the props we're passing. Let's move on to the next test case.
...
describe('<BarItem />', () => {
  ...
  it('should render a bar with negative values', () => {});
});
In the code above, I gave you the description of the second test case. As a challenge, add the codes that should be inside the second test case block and compare your code with the expected code later. The tip here is that it would be very similar to the first case.
Done? Alright. Here's the the expected code:
...
describe('<BarItem />', () => {
  ...
  it('should render a bar with negative values', () => {
    const legend = faker.lorem.sentence();
    const barPercent = faker.datatype.number({ min: 0, max: 100 });
    const barPercentage = `${barPercent}%`;
    const risePercent = faker.datatype.number({ min: 0, max: barPercent });
    const risePercentage = `${risePercent}%`;

    renderComponent({
      legend,
      barPercentage,
      risePercentage,
      isNegative: true,
    });

    const barItemEl = screen.queryByTestId('bar-item');
    const barMainEl = screen.queryByTestId('bar-item-main');
    const barOffsetEl = screen.queryByTestId('bar-item-offset');
    const barLegendEl = screen.queryByTestId('bar-item-legend');

    expect(barItemEl).toHaveClass('is-negative');
    expect(barMainEl).toHaveStyle({ height: barPercentage });
    expect(barOffsetEl).toHaveStyle({ height: risePercentage });
    expect(barLegendEl).toHaveTextContent(legend);
  });
});
Save your changes and let's see the result of our tests in the terminal.
Awesome! We're done with the tests for our BarItem component. Let's move on to the next component.
Write tests for BarGraph component
Same as what we did for the BarItem component, let's first add the data-testid attribute in our BarGraph component to help us query the elements in the component later. Querying an element, checking its attributes and content is the most common way to test a component. Open src/components/BarGraph.tsx and update the code with the following:
...
export default function BarGraph({ dataArray }: Props) {
  ...
  return (
    <div className="bar-graph">
      <div className="bars-list">
        ...
      </div>
      <div
        ...
        data-testid="bars-line"
      />
    </div>
  );
}
You might ask why we didn't need to add the data-testid attribute for the bars-list element. That's because we can query for the bar-item elements using their data-testid we already added earlier and use the .queryAllByTestId() function to return an array of elements instead of one element.
Now it's time to write tests for the BarGraph component. Create the test file with the following path src/components/__tests__/BarGraph.test.tsx and add the initial code:
import { render } from '@testing-library/react';
import BarGraph, { Props } from '../BarGraph';

describe('<BarGraph />', () => {
  const renderComponent = (props: Props) => render(<BarGraph {...props} />);
});
Alright. What should be our first test case? We can actually use the three graphs we used to help us handle all the scenarios for our bar graph component. To help you recall, here was the screenshot from Part 1:
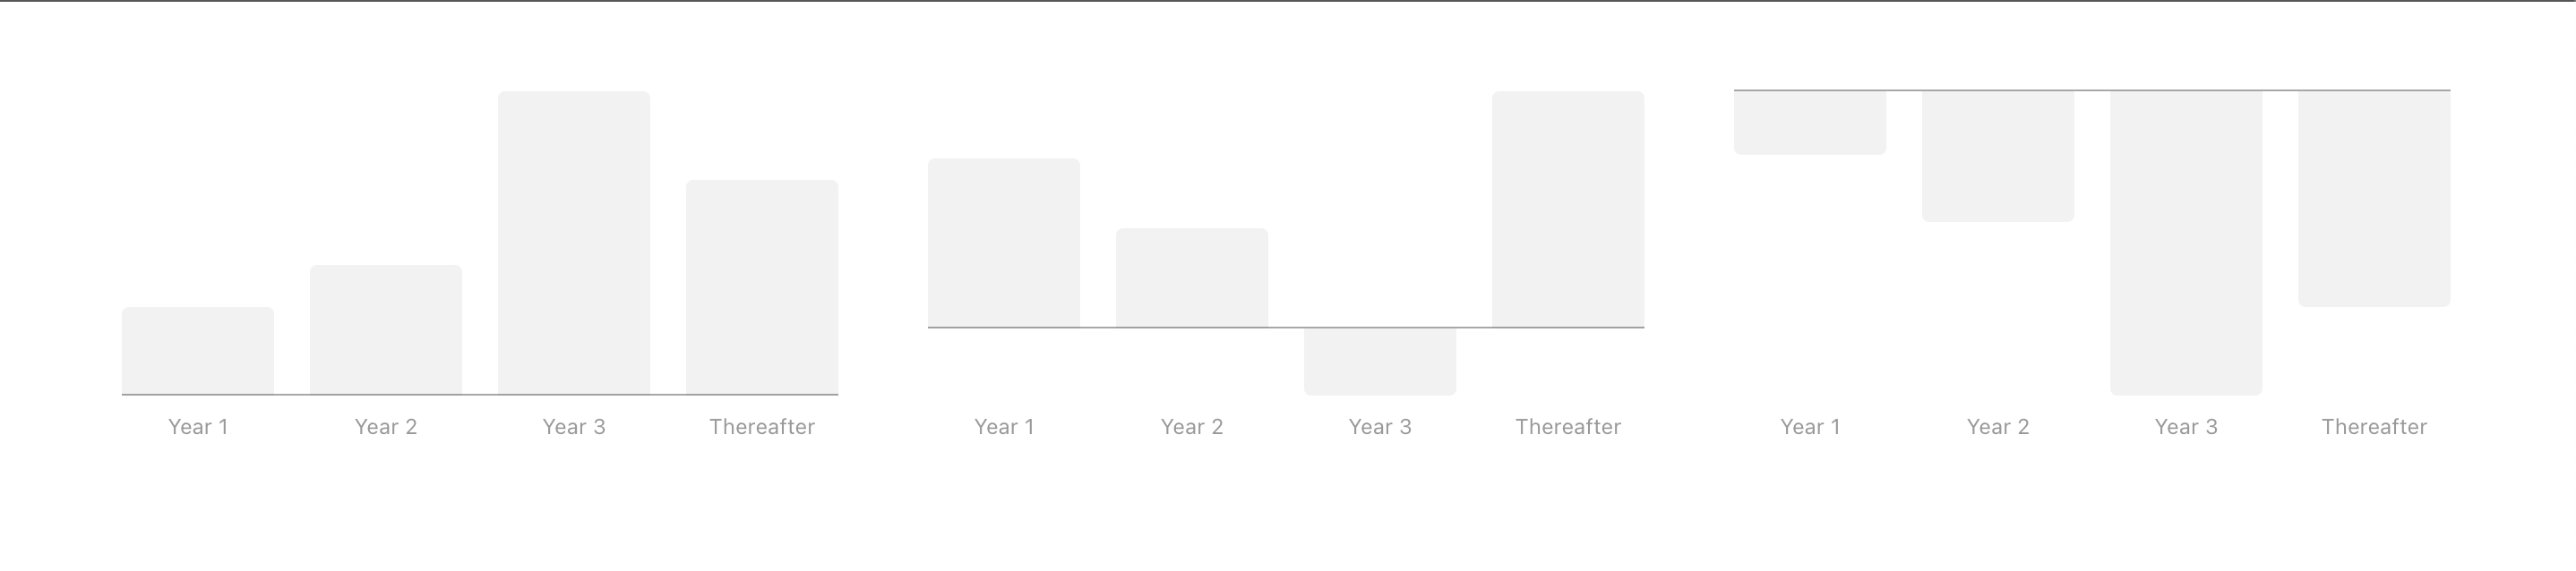
Starting from the left of the image or screenshot, the first graph displays a bar graph with all positive values, the line bar is at the bottom and one of the bars with the highest value occupies 100% of the graph height. The second graph displays a bar graph with one negative value, notice how the line bar elevates the same level as the bars with positive values. You could also say that the height of the bar with negative value is the same level as the line bar's elevation level. The third graph displays a bar graph with all negative values, aside from the line bar elevating, bars with smaller negative values also elevate until it sticks to the line bar.
So let's start with the first graph with all positive values. We won't be using faker to generate the values in the dataArray because in order to verify the random values, we need to also generate the expected results or percentages of them and we'll probably end up copying the code from the main file and that will make the test file complicated and difficult to understand. Hence, it would be better to hardcode the values along with the expected result array.
Let's use the same dataArray we have from the App component for our first test case. Here's the additional code for our first test case in src/components/__tests__/BarGraph.test.tsx:
...
import { faker } from '@faker-js/faker';

describe('<BarGraph />', () => {
  const renderComponent = (props: Props) => render(<BarGraph {...props} />);

  it('should convert positives values to percentages', () => {
    const expectedPercentages = ['29%', '43%', '100%', '71%'];
    const dataArray = [
      {
        value: 200,
        legend: faker.lorem.sentence(),
      },
      {
        value: 300,
        legend: faker.lorem.sentence(),
      },
      {
        value: 700,
        legend: faker.lorem.sentence(),
      },
      {
        value: 500,
        legend: faker.lorem.sentence(),
      },
    ];

    renderComponent({ dataArray });
  });
});
You might be wondering how I get the hardcoded values for the expectedPercentages. I got it by using the inspect element feature of the browser I'm using. You can inspect the elements to view the HTML of our React app and you will be able to see the controlled style properties such as height and bottom. Here's an article on how to use the inspect element feature in Chrome, Safari and Firefox.
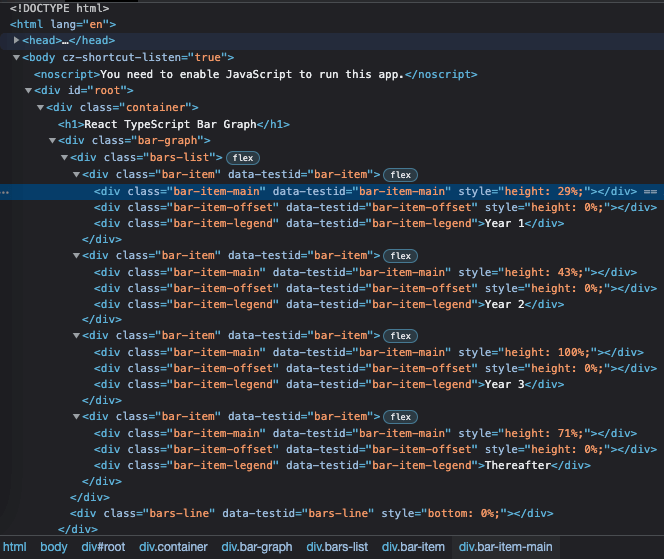
I have stored the expected percentages in an array called expectedPercentages to make our checks efficient later when looping through the dataArray and match their indexes with the items from the dataArray. For the legend props, we still use faker to generate the text because it is straightforward to verify by just comparing the element's content to it.
Alright, we're all set to check our rendered component and verify whether each bar has the expected percentage. We need to query all of the bar-item-main elements from our rendered component. Here's the code for that:
...
describe('<BarGraph />', () => {
  ...
  it('should convert positives values to percentages', () => {
    ...

    renderComponent({ dataArray });

    const barPercentageItems = screen.queryAllByTestId('bar-item-main');
  });
});
As for our first check, let's check that the array length for barPercentageItems is the same as the length of our dataArray:
...
describe('<BarGraph />', () => {
  ...
  it('should convert positives values to percentages', () => {
    ...

    const barPercentageItems = screen.queryAllByTestId('bar-item-main');

    expect(barPercentageItems).toHaveLength(dataArray.length);
  });
});
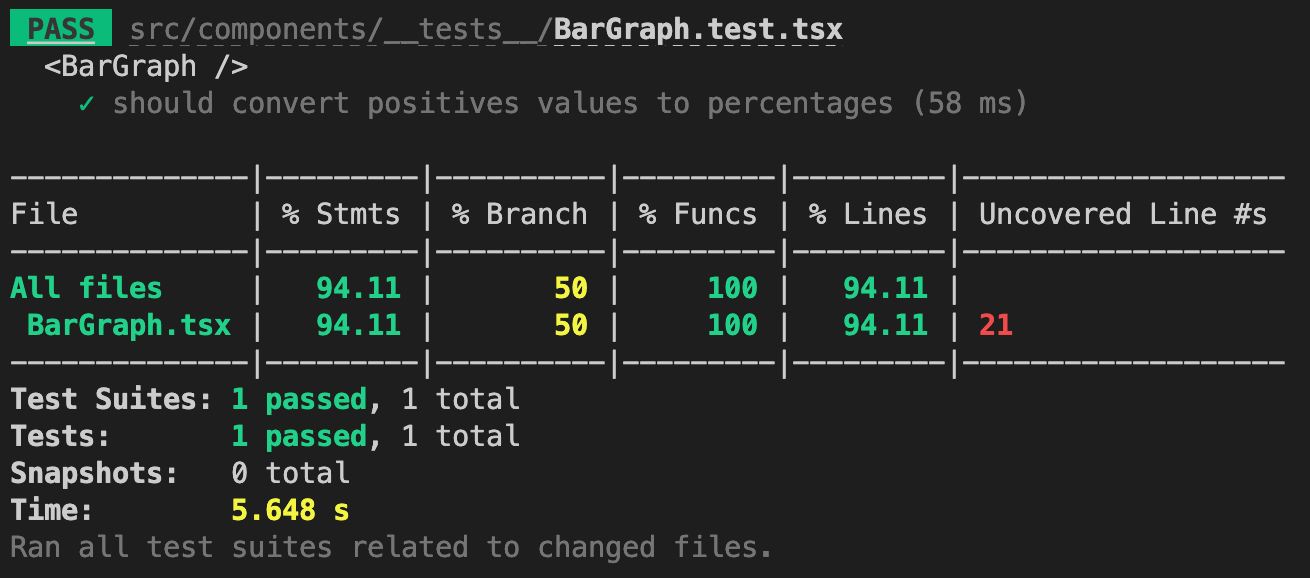
Save the change and let's see if this passes by looking at our terminal:
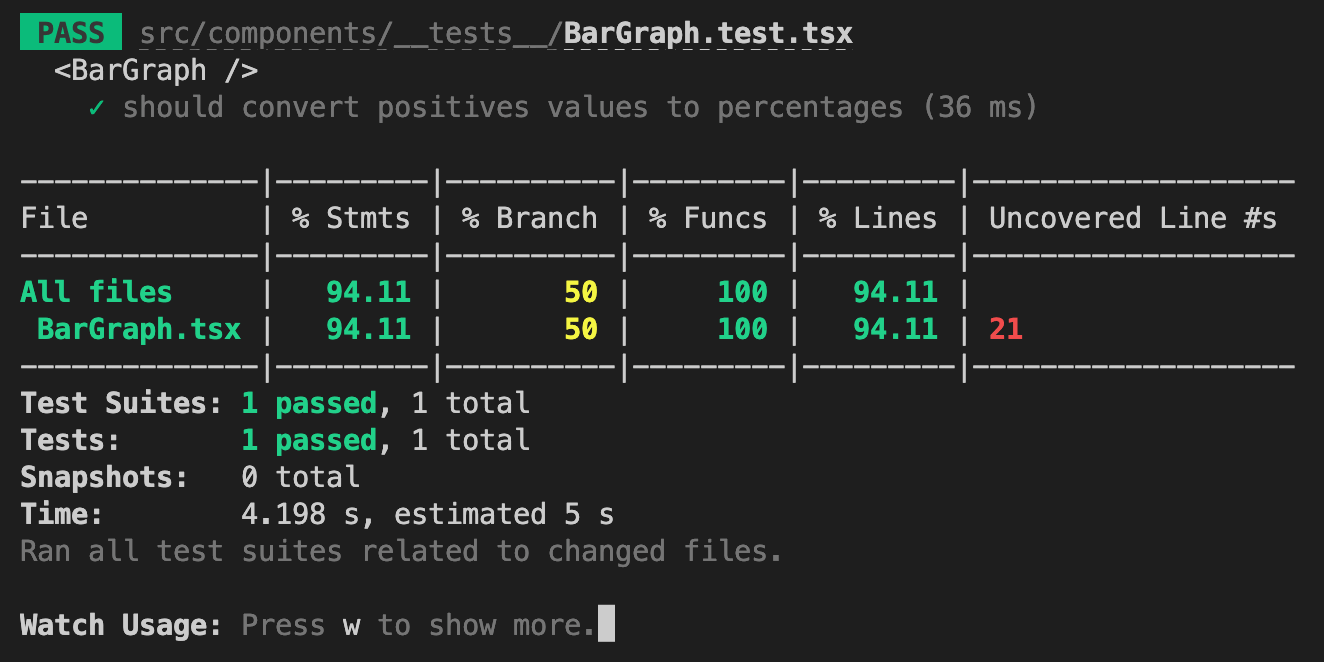
Awesome, it passed! You can also see how useful having the test coverage information is because it will tell you which lines of the main file have not been covered yet. We should be able to cover that line in the next test cases but we're not done with our first test case yet. We still need to loop through the bar-item-main elements or the barPercentageItems and verify that their percentage or height CSS property is what we expect it to be. Here's the code for that:
...
describe('<BarGraph />', () => {
  ...
  it('should convert positives values to percentages', () => {
    ...
    expect(barPercentageItems).toHaveLength(dataArray.length);

    barPercentageItems.forEach((element, idx) => {
      expect(element).toHaveStyle({
        height: expectedPercentage[idx],
      });
    });
  });
});
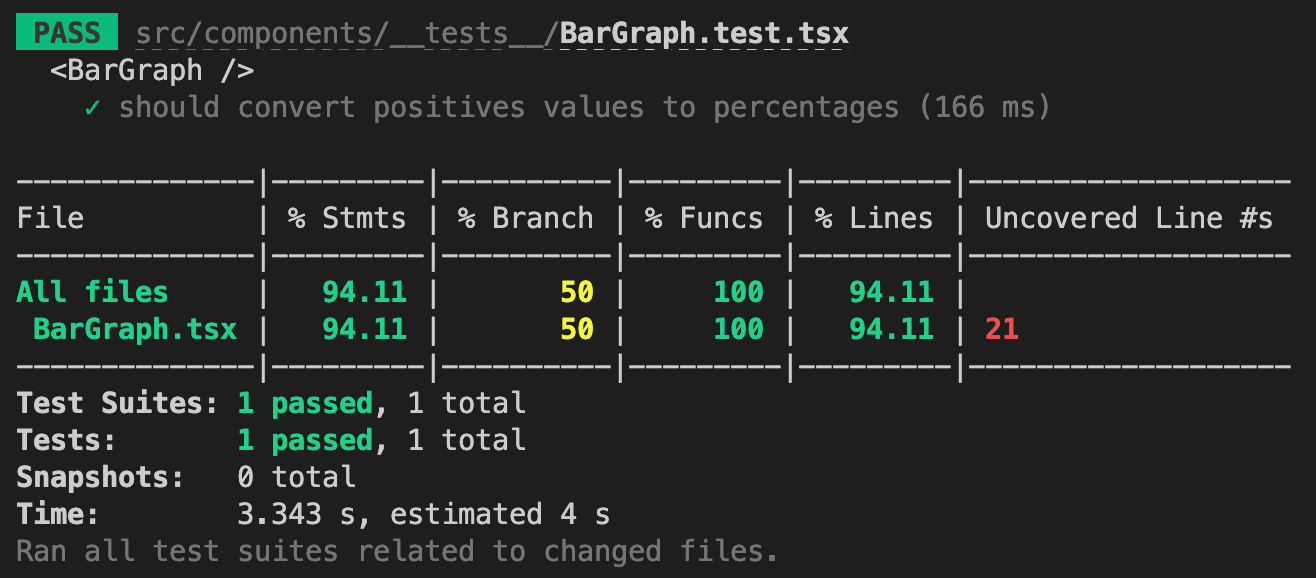
Don't forget to save your changes. Now take a look at our terminal to see if it also passes:
And yes it still does.
In the same test case, we also need to check whether the elevation for each bar is what we expect it to be. Because all of them are in positive values, we expect the elevation or the height CSS property of each bar-item-offset element to be 0%. We can query for the bar-item-offset elements the same way we did for the bar-item-main elements. Let's update the code with the following below:
...
describe('<BarGraph />', () => {
  ...
  it('should convert positives values to percentages', () => {
    ...
    const barPercentageItems = screen.queryAllByTestId('bar-item-main');
    const barOffsetItems = screen.queryAllByTestId('bar-item-offset');

    expect(barPercentageItems).toHaveLength(dataArray.length);
    expect(barOffsetItems).toHaveLength(dataArray.length);

    barPercentageItems.forEach((element, idx) => {
      expect(element).toHaveStyle({
        height: expectedPercentage[idx],
      });
    });

    barOffsetItems.forEach((element) => {
      expect(element).toHaveStyle({ height: '0%' });
    });
  });
});
Alright. When we save our changes, this is what we should see from the terminal:
We can optimize our test case by just doing one loop and here's the refactored code:
...
describe('<BarGraph />', () => {
  ...
  it('should convert positives values to percentages', () => {
    ...
    const barPercentageItems = screen.queryAllByTestId('bar-item-main');
    const barOffsetItems = screen.queryAllByTestId('bar-item-offset');

    expect(barPercentageItems).toHaveLength(dataArray.length);
    expect(barOffsetItems).toHaveLength(dataArray.length);

    barPercentageItems.forEach((element, idx) => {
      expect(element).toHaveStyle({
        height: expectedPercentages[idx],
      });
      expect(barOffsetItems[idx]).toHaveStyle({ height: '0%' });
    });
  });
});
Save the following changes above and the test case should still pass.
In the same test case again, we need to check that the legends are displayed accordingly. We can query for the bar-item-legends elements and get the expected legend for each bar from the dataArray using the array index. Let's update the code with the following below to verify that:
...
describe('<BarGraph />', () => {
  ...
  it('should convert positives values to percentages', () => {
    ...
    const barPercentageItems = screen.queryAllByTestId('bar-item-main');
    const barOffsetItems = screen.queryAllByTestId('bar-item-offset');
    const barLegendItems = screen.queryAllByTestId('bar-item-legend');

    expect(barPercentageItems).toHaveLength(dataArray.length);
    expect(barOffsetItems).toHaveLength(dataArray.length);
    expect(barLegendItems).toHaveLength(dataArray.length);

    barPercentageItems.forEach((element, idx) => {
      expect(element).toHaveStyle({
        height: expectedPercentages[idx],
      });
      expect(barOffsetItems[idx]).toHaveStyle({ height: '0%' });
      expect(barLegendItems[idx]).toHaveTextContent(dataArray[idx].legend);
    });
  });
});
After saving the changes, the test case will still pass as expected.
Okay. Finally, to complete our first test case for the BarGraph component, let's also check whether the bars-line element elevation or the bottom CSS property of it is what we expect. Since the values for the bar graph are all positive values, we expected it to be at the very bottom or the value of the bottom CSS property is 0%. Let's update the code to include this check:
...
describe('<BarGraph />', () => {
  ...
  it('should convert positives values to percentages', () => {
    ...
    barPercentageItems.forEach((element, idx) => {
      ...
    });

    const barsLine = screen.queryByTestId('bars-line');

    expect(barsLine).toHaveStyle({ bottom: '0%' });
  });
});
And this should pass after saving the changes.
Let's move on to the second test case where we handle the second graph from the reference screenshot. Our dataArray will have one negative value. Let's copy the dataArray from the App component again and here's the initial code for our second test case in src/components/__tests__/BarGraph.test.tsx:
...
describe('<BarGraph />', () => {
  ...
  it('should convert positives values to percentages', () => {
    ...
  });

  it('should convert positive values and one negative value to percentages', () => {
    const expectedPercentages = ['56%', '33%', '22%', '78%'];
    const expectedOffsets = ['22%', '22%', '0%', '22%'];
    const expectedBarsLine = '22%';
    const dataArray = [
      {
        value: 500,
        legend: faker.lorem.sentence(),
      },
      {
        value: 300,
        legend: faker.lorem.sentence(),
      },
      {
        value: -200,
        legend: faker.lorem.sentence(),
      },
      {
        value: 700,
        legend: faker.lorem.sentence(),
      },
    ];

    renderComponent({ dataArray });
  });
  });
});
Okay, I've added the expected percentages and offsets. As a challenge for yourself, you can try to complete the code to verify our second test case using the first test case as your reference.
Once you're done, you can take a look at the expected code of the second test case below:
...
describe('<BarGraph />', () => {
  ...
  it('should convert positive values and one negative value to percentages', () => {
    ...

    renderComponent({ dataArray });

    const barPercentageItems = screen.queryAllByTestId('bar-item-main');
    const barOffsetItems = screen.queryAllByTestId('bar-item-offset');
    const barLegendItems = screen.queryAllByTestId('bar-item-legend');

    expect(barPercentageItems).toHaveLength(dataArray.length);
    expect(barOffsetItems).toHaveLength(dataArray.length);

    barPercentageItems.forEach((element, idx) => {
      expect(element).toHaveStyle({
        height: expectedPercentages[idx],
      });
      expect(barOffsetItems[idx]).toHaveStyle({ height: expectedOffsets[idx] });
      expect(barLegendItems[idx]).toHaveTextContent(dataArray[idx].legend);
    });

    const barsLine = screen.queryByTestId('bars-line');

    expect(barsLine).toHaveStyle({ bottom: expectedBarsLine });
  });
});
Was your code similar to the code above? If yes, then great! If not, no worries. Just keep practicing as we all know, practice makes perfect.
Once you save the changes, our second test case should pass:
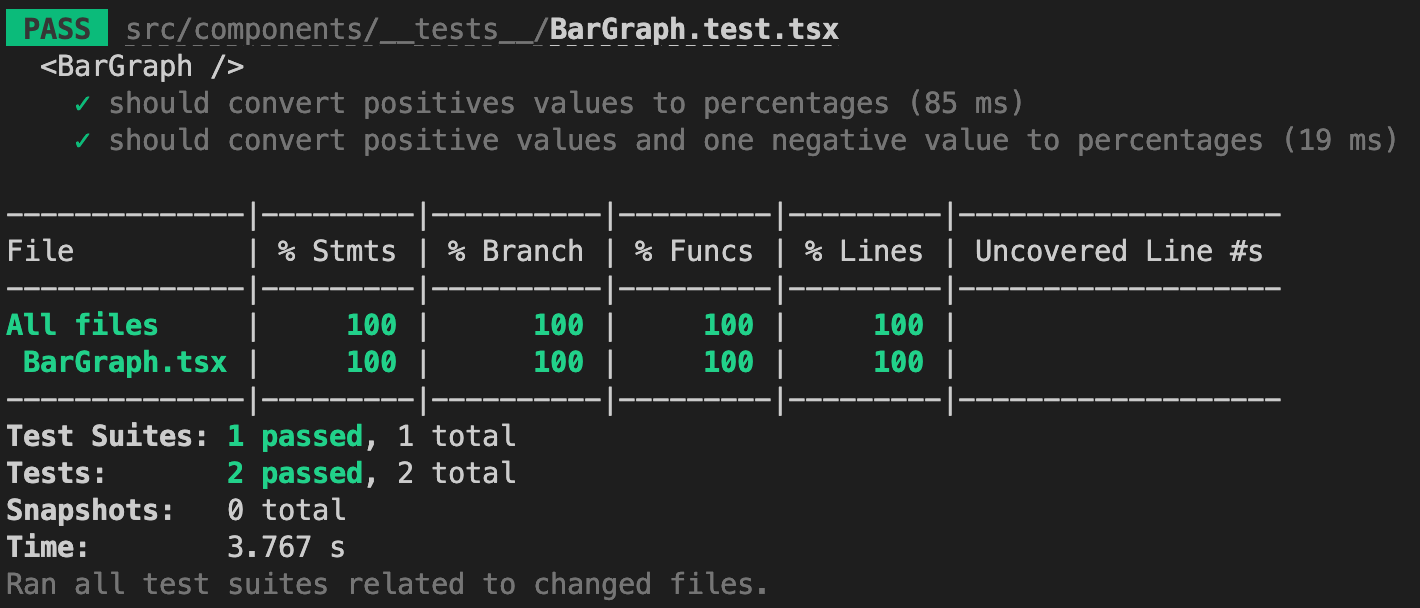
In the screenshot above, we've already reached 100% test coverage. You might want to stop here, but just to make sure our BarGraph component can handle if all the values are negative, we should create a test case for that as well.
Here's the code for the final test case which is just very similar from our second test case:
...
describe('<BarGraph />', () => {
  ...
  it('should convert negatives values to percentages', () => {
    const expectedPercentages = ['21%', '43%', '100%', '71%'];
    const expectedOffsets = ['79%', '57%', '0%', '29%'];
    const expectedBarsLine = '100%';
    const dataArray = [
      {
        value: -150,
        legend: faker.lorem.sentence(),
      },
      {
        value: -300,
        legend: faker.lorem.sentence(),
      },
      {
        value: -700,
        legend: faker.lorem.sentence(),
      },
      {
        value: -500,
        legend: faker.lorem.sentence(),
      },
    ];

    renderComponent({ dataArray });

    const barPercentageItems = screen.queryAllByTestId('bar-item-main');
    const barOffsetItems = screen.queryAllByTestId('bar-item-offset');
    const barLegendItems = screen.queryAllByTestId('bar-item-legend');

    expect(barPercentageItems).toHaveLength(dataArray.length);
    expect(barOffsetItems).toHaveLength(dataArray.length);

    barPercentageItems.forEach((element, idx) => {
      expect(element).toHaveStyle({
        height: expectedPercentages[idx],
      });
      expect(barOffsetItems[idx]).toHaveStyle({ height: expectedOffsets[idx] });
      expect(barLegendItems[idx]).toHaveTextContent(dataArray[idx].legend);
    });

    const barsLine = screen.queryByTestId('bars-line');

    expect(barsLine).toHaveStyle({ bottom: expectedBarsLine });
  });
});
Don't forget to save the changes and take a look at the final screenshot of our terminal below:
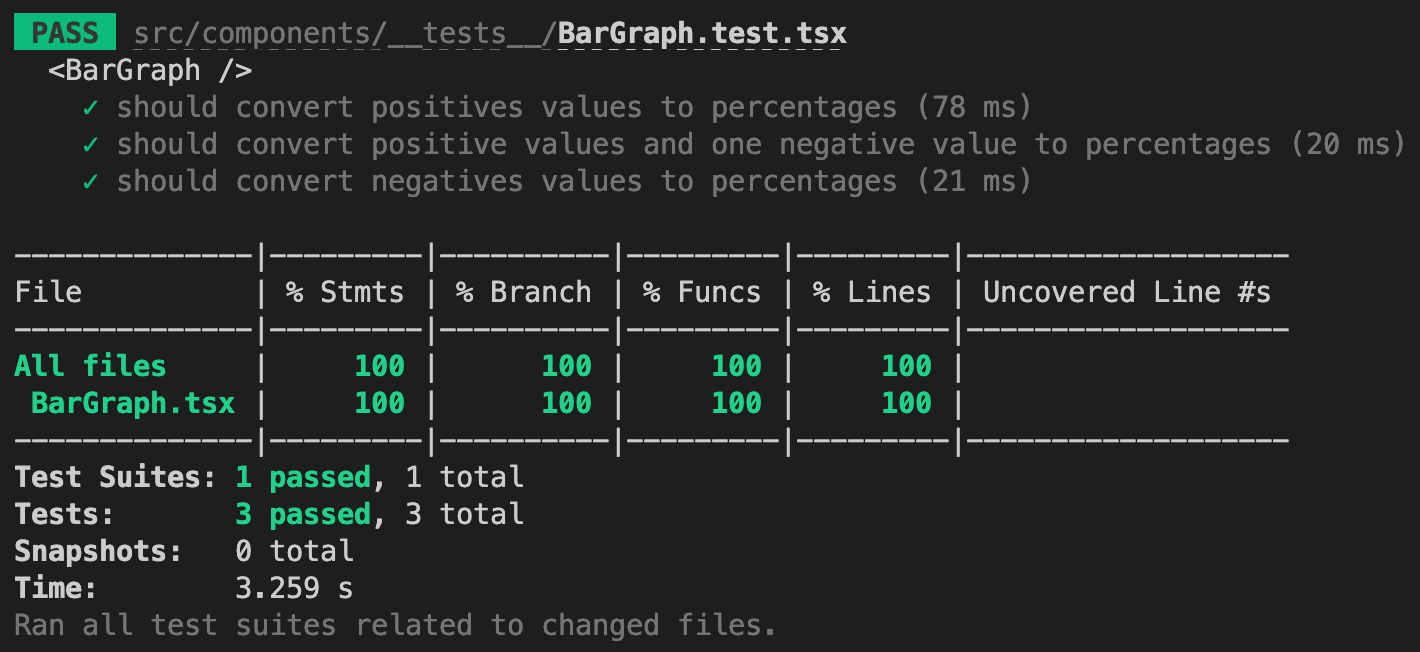
Alright, we are done! We've managed to write tests with 100% test coverage for our newly created bar graph component that can handle positive and negative values built in React and TypeScript.
I hope you learned a lot from this post. Please don't forget to share this post to those people you think might find this helpful as well. If you like this series of posts for React and TypeScript with tests, you can check the rest of them here. There's still more to come so do check them out once they're published.