Introduction
If you haven't heard about it yet, there's already an email framework that makes it less painful to build responsive email templates. It's called MJML - short for Mailjet Markup Language. Originally created by a team of developers at Mailjet, MJML's objective is to simplify the way people design responsive emails. If you're new to it, then you're in the right place because I'm going to build an email template using MJML framework in a step by step way so you can follow me along.
Prerequisites
To start, you would need to set up your local development for MJML framework, I've written a separate post just for that, but you can also just clone the boilerplate to save time:
git clone git@github.com:dominicarrojado/mjml-email-framework-boilerplate.git mjml-sample-edm
This is the link to the email template we'll accomplish by the end of this post, you can use it as your reference throughout this tutorial.
By the way, upon writing this post, I assume that you have some web development background and basic knowledge regarding npm, yarn, HTML and CSS.
Some prerequisites below. Make sure to install them if you haven't!
Alright, let's start by opening our project in Visual Studio Code.
Then, open the terminal in Visual Studio Code. The keyboard shortcut would be Ctrl + `.
Next, type the following below in your terminal to install the dependencies of the boilerplate:
yarn install
Once installed, you can run the local development by typing the script in your terminal:
yarn run dev
This command will open your default browser and go to http://localhost:8080/src/. If it doesn't, you can do it yourself too. You should be able to see the boilerplate with the text Hello World displayed on your browser. If you end up seeing the directory of /src/, just refresh the page and you should see your email template. This is the index.html served by our local server.
Clean up the project
Now, let's clean up our project. We won't be needing some of them. Delete or clear the contents of the following below:
- src/images/logo-mjml.png (delete)
- src/index.mjml (clear contents)
Initial structure
Let's set up the initial structure of our MJML code. Open the main file src/index.mjml and type the following below:
<mjml>
  <mj-head> </mj-head>
  <mj-body> </mj-body>
</mjml>
This should look very familiar to you since it's like <html>, <head> and <body> in regular HTML. That's what I like about MJML, it doesn't look too foreign. It doesn't feel like writing code in a new language. It's more of an extension of what we already know and used to.
Inside <mj-head> tag we can define things like breakpoint, attribute overrides, create reusable classes and styles and inside <mj-body> tag is where the sections of our email template will be.
Breakpoint & attributes
To start with, let's define the breakpoint by writing the following code below:
<mjml>
  <mj-head>
    <mj-breakpoint width="600px" />
  </mj-head>
  ...
</mjml>
The <mj-breakpoint> tag allows us to control on which breakpoint the layout should go desktop/mobile.
Next, let's define a default style for our MJML components. We can define them inside the <mj-attributes> tag. Let's update the code with the following below:
<mjml>
  <mj-head>
    <mj-breakpoint width="600px" />
    <mj-attributes>
      <mj-all color="#2C2C2C" font-family="Arial" padding="0" />
    </mj-attributes>
  </mj-head>
  ...
</mjml>
Using <mj-all> tag makes it easier to override the style of MJML components via one tag. I have also set the padding to 0 because some components have default padding, by resetting it to 0 will make it easier for us to construct our template especially when following the expected design. We can add MJML component tags (like <mj-section>, <mj-column>, <mj-text>, etc.) inside <mj-attributes> tag to override the default settings on a specific component. We can also apply styles to a group of components using <mj-class> tag to help us reduce duplications in our code; we'll get to use that later as well.
Body
Moving on to <mj-body> tag for now, we can set the background color of our entire template with the code below:
<mjml>
  ...
  <mj-body background-color="#F2F2F2"> </mj-body>
</mjml>
As you can tell by now, from setting our default styles to setting the body's background color, it looks exactly the same way we define it in CSS. This is another thing which I like about MJML. The syntax is so simple!
Email Title section
Now, let's build the first section of our email template. It's good to add a comment to your sections so it would be easier to locate them when maintaining it in the future. So below, I've added the <mj-section> tag inside the <mj-body> tag. These tags are intended to be used as rows within our email template. They are used to structure the layout. By default, it has a width of 600px, since that's also the width of our sections based on the design, so we don't need to specify the width.
<mjml>
  ...
  <mj-body background-color="#F2F2F2">
    <!-- Email Title -->
    <mj-section> </mj-section>
    <!-- End Email Title -->
  </mj-body>
</mjml>
Next, let's add the <mj-group> tag inside the <mj-section> tag. This tag prevents columns from stacking on mobile.
<mjml>
  ...
  <mj-body background-color="#F2F2F2">
    <!-- Email Title -->
    <mj-section>
      <mj-group> </mj-group>
    </mj-section>
    <!-- End Email Title -->
  </mj-body>
</mjml>
Then, let's add the <mj-column> tag inside the <mj-group> tag. This tag enables us to horizontally organize the content within our sections. Column width should be expressed in percentage to be responsive, if not defined will be 100% divided by the number of its siblings. Every single column has to contain something because they are responsive containers, and will be vertically stacked on a mobile view but in this case it won't because of its parent <mj-group> preventing it.
<mjml>
  ...
  <mj-body background-color="#F2F2F2">
    <!-- Email Title -->
    <mj-section>
      <mj-group>
        <mj-column> </mj-column>
      </mj-group>
    </mj-section>
    <!-- End Email Title -->
  </mj-body>
</mjml>
To finish off this section, let's add <mj-text> tag along with the expected styles from the design - see the code below. Now you may ask, can I just use <mj-text> tag alone since we are not styling anything or use any features from <mj-section> until the <mj-column>? The answer would be no. This structure is standardized by MJML. We can't use <mj-text> tags without wrapping it in a <mj-column> tag. Same for <mj-column> tags, it needs to be wrapped inside <mj-section> or <mj-group> tag. And <mj-section> tags need to be wrapped inside <mj-body> or <mj-wrapper> tag.
<mjml>
  ...
  <mj-body background-color="#F2F2F2">
    <!-- Email Title -->
    <mj-section>
      <mj-group>
        <mj-column>
          <mj-text
            align="center"
            padding="5px 0"
            color="#999999"
            font-size="10px"
            line-height="18px"
          >
            Integer faucibus ipsum et ex congue efficitur
          </mj-text>
        </mj-column>
      </mj-group>
    </mj-section>
    <!-- End Email Title -->
  </mj-body>
</mjml>
Don't worry if you're not used to writing this structure at the start, with the help of MJML extension in Visual Studio Code, you would get inline errors when the standard structure is violated. You can hover on the inline error and it would explain to you what you violated along with how to fix it. You would also get inline errors if you try to add styles not supported by the MJML component tag.

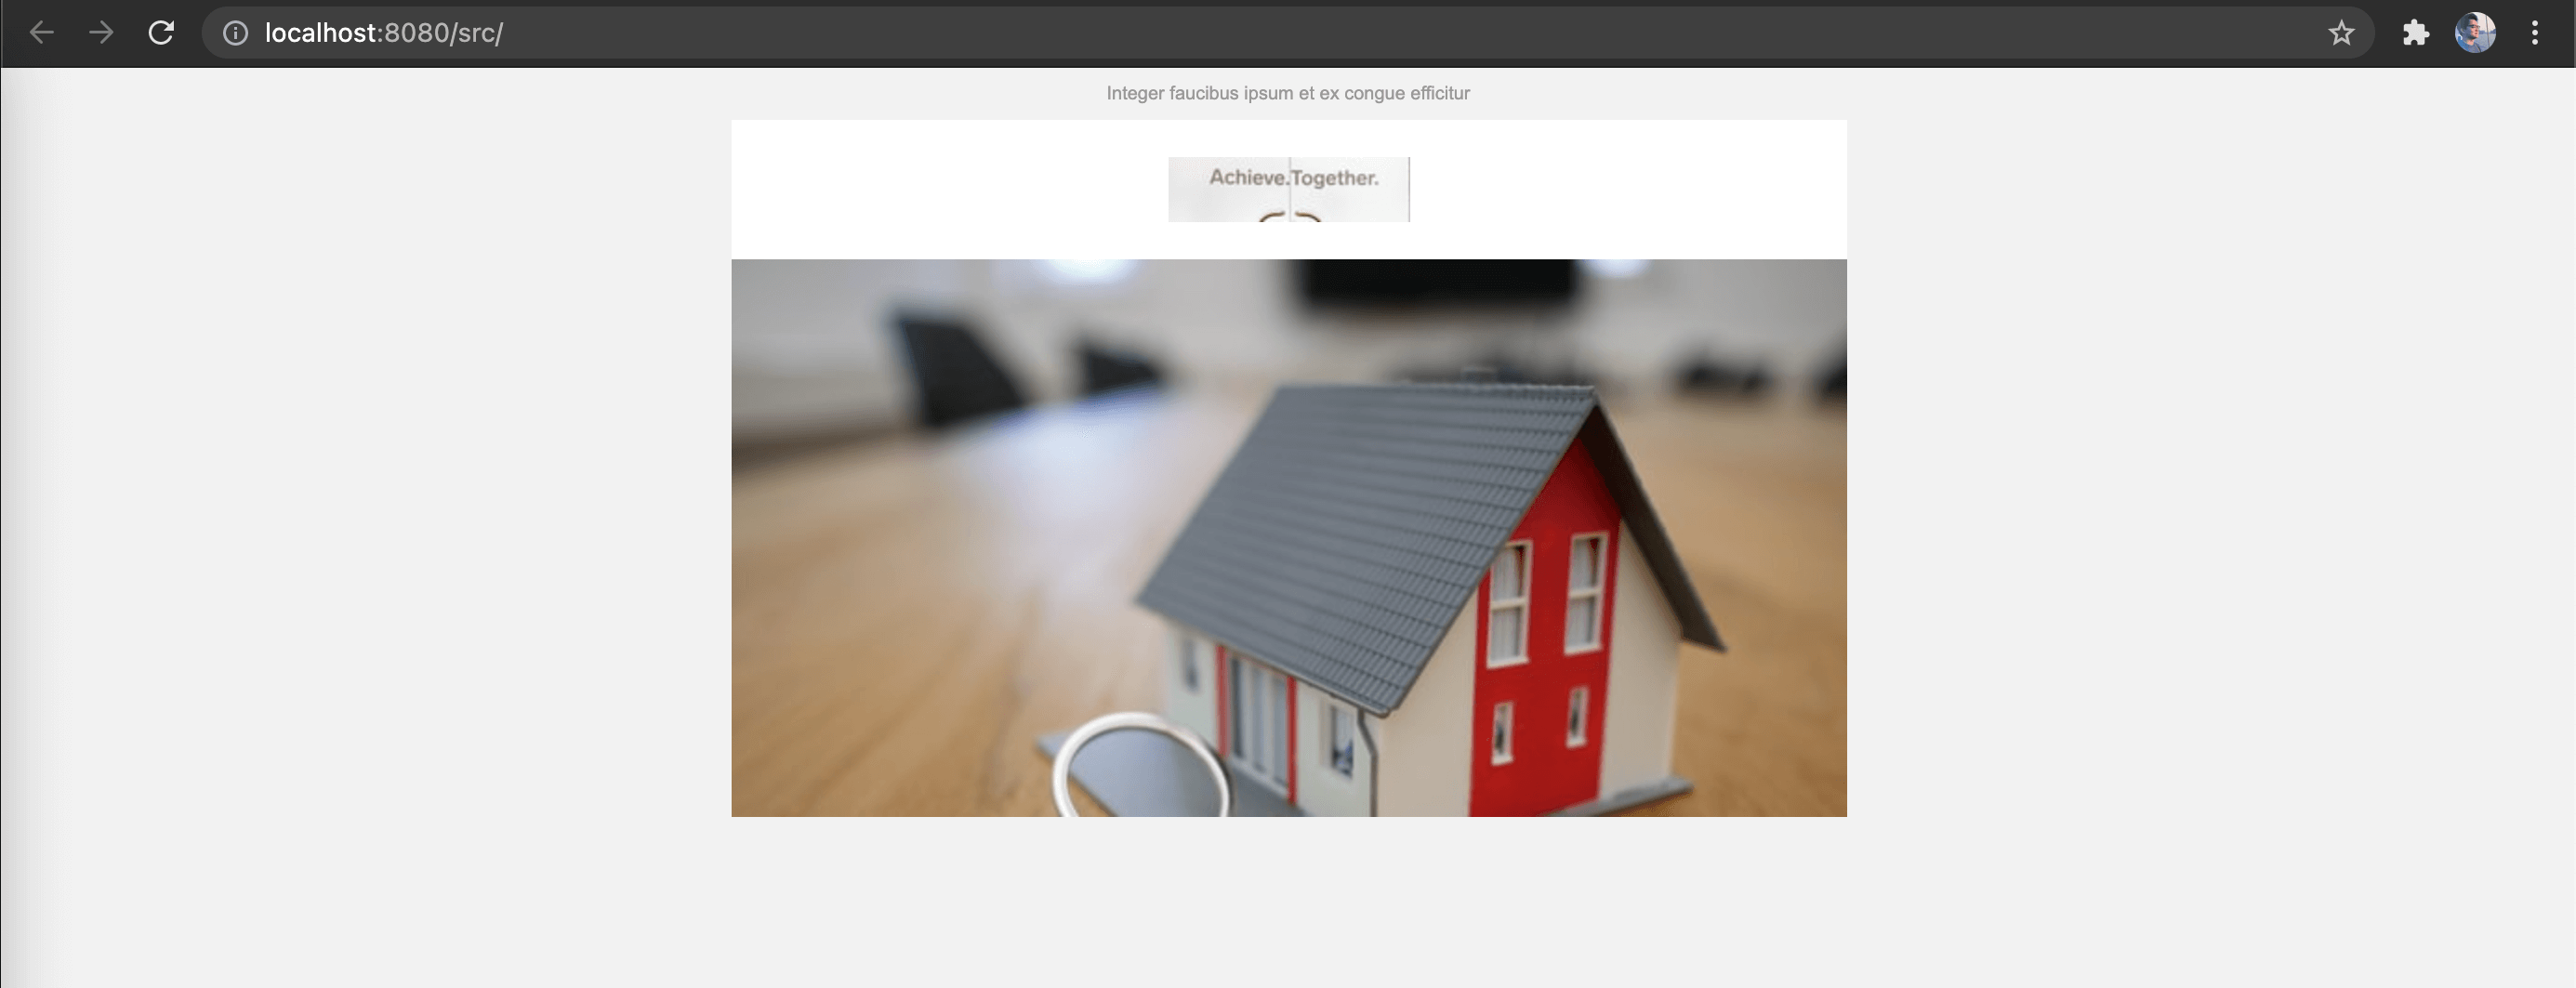
Once you save the changes, our email template should look like this:

Company Header section
Let's move on to the next section. Before we do some code changes, open this link and download the image. Put the image inside the /src/images/ folder.
After you've done that, let's add the following code just below the previous section:
<mjml>
  ...
  <mj-body background-color="#F2F2F2">
    ...
    <!-- Company Header -->
    <mj-section>
      <mj-group>
        <mj-column background-color="#FFFFFF" padding="20px">
          <mj-image
            href="https://www.example.com/"
            target="_blank"
            src="images/logo.jpeg"
            alt="logo"
            width="130px"
            height="35px"
          />
        </mj-column>
      </mj-group>
    </mj-section>
    <!-- End Company Header -->
  </mj-body>
</mjml>
The new tag <mj-image> we used in the code is just similar to an <img> tag in HTML but what's special about this tag is that it can also accept href and target attributes like an anchor tag. This is a good feature for images such as company logos to redirect your target to the company website.
It's also good to add descriptive alt text in images in case it doesn't load in some email platforms due to image blocking. Note that if we don't provide the width, the image will use the parent column width.
Once you save the changes, this is how our email template should look like now:

Hero section
The next section is relatively similar to the previous section, it's just an image as well. You can open this link and download the image. Put the image inside the /src/images/ folder.
Then write the following code for the section:
<mjml>
  ...
  <mj-body background-color="#F2F2F2">
    ...
    <!-- Hero -->
    <mj-section>
      <mj-group>
        <mj-column>
          <mj-image
            src="images/hero.jpeg"
            alt="a miniature house keychain on the table"
          />
        </mj-column>
      </mj-group>
    </mj-section>
    <!-- End Hero -->
  </mj-body>
</mjml>
If you noticed, we didn't provide width or height. This is because we want it to take up 100% of its parent column width. Since the section's default width is 600px then the image follows this width and the height will automatically adjust. The image will also become responsive on a smaller viewport, you can resize your window to check it out.
Let's look at how our email template looks like now:
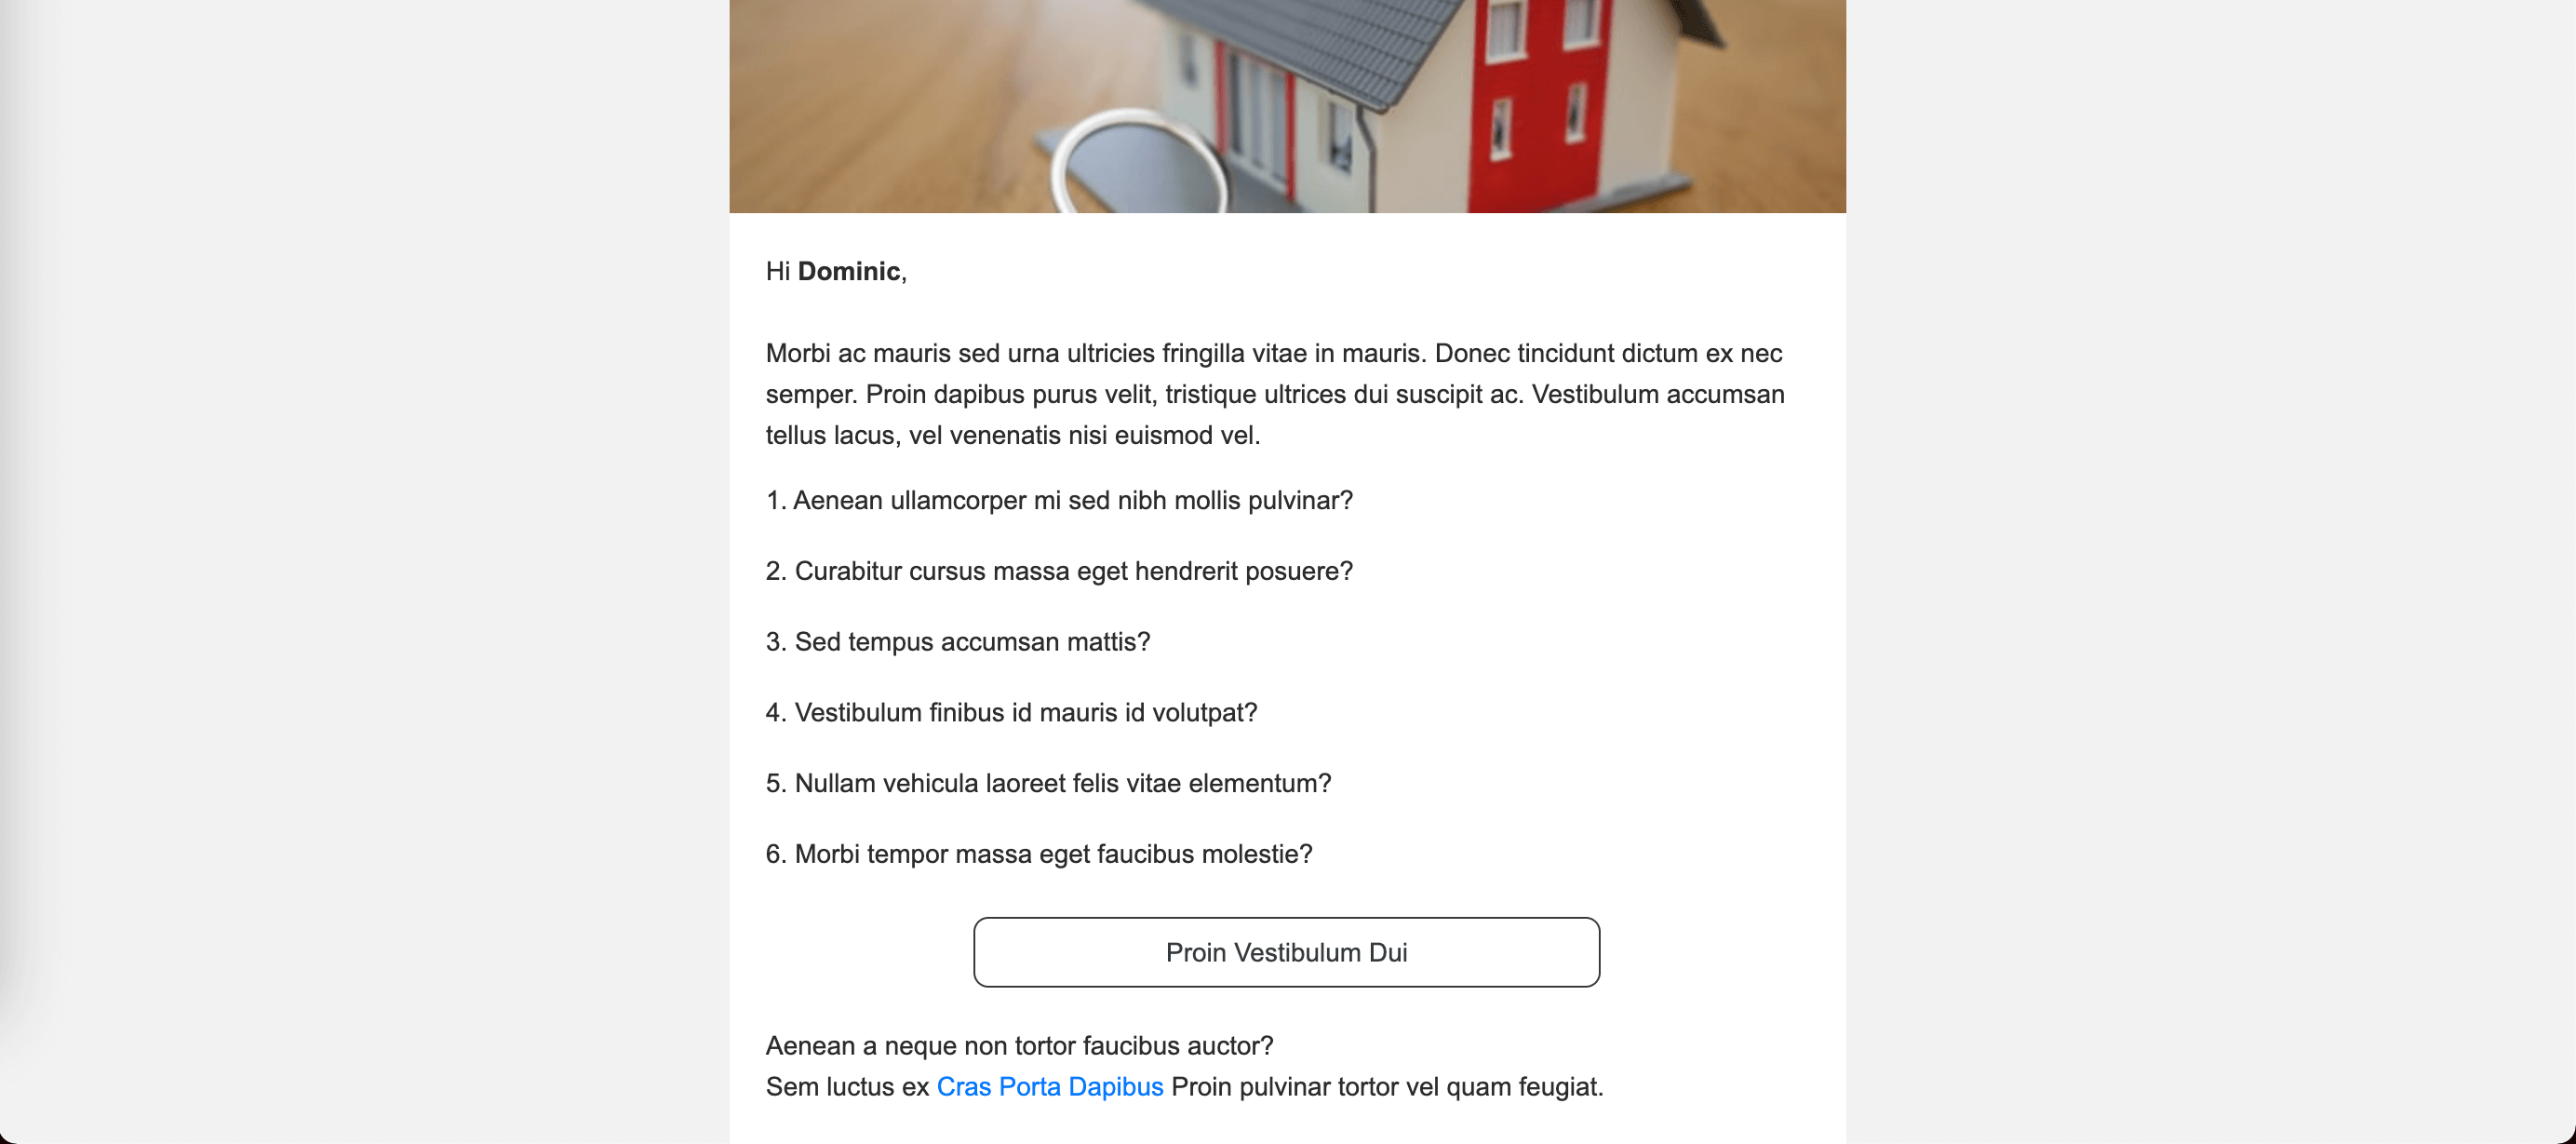
Main Content section
Alright, let's move on to the next section. Let's ignore the list and just write code for the first and last paragraph:
<mjml>
  ...
  <mj-body background-color="#F2F2F2">
    ...
    <!-- Main Content -->
    <mj-section background-color="#FFFFFF">
      <mj-group>
        <mj-column padding="20px">
          <mj-text font-size="14px" line-height="22px">
            Hi <strong>Dominic</strong>, <br /><br />
            Morbi ac mauris sed urna ultricies fringilla vitae in mauris. Donec
            tincidunt dictum ex nec semper. Proin dapibus purus velit, tristique
            ultrices dui suscipit ac. Vestibulum accumsan tellus lacus, vel
            venenatis nisi euismod vel.
          </mj-text>
          <mj-text font-size="14px" line-height="22px" padding-top="20px">
            Aenean a neque non tortor faucibus auctor? <br />
            Sem luctus ex Cras Porta Dapibus Proin pulvinar tortor vel quam
            feugiat.
          </mj-text>
        </mj-column>
      </mj-group>
    </mj-section>
    <!-- End Main Content -->
  </mj-body>
</mjml>
The reason why we didn't write the code for the list yet is because I wanted to show you the similarities of the first and last paragraph. Notice that they have the same font-size and line-height. For such cases, we can make use of the <mj-class> tag to reduce the redundancy and make it easier to maintain in the future. Let's scroll back up to our code where the <mj-attributes> tag is located. Then create an <mj-class> tag inside it with a name value of body-text as well as the shared styles of the paragraphs:
<mjml>
  <mj-head>
    ...
    <mj-attributes>
      ...
      <mj-class name="body-text" font-size="14px" line-height="22px" />
    </mj-attributes>
  </mj-head>
</mjml>
Then we can update the MJML components that will make use of the shared styles by setting their mj-class attribute to body-text like this:
<mjml>
  ...
  <mj-body background-color="#F2F2F2">
    ...
    <!-- Main Content -->
    <mj-section background-color="#FFFFFF">
      <mj-group>
        <mj-column padding="20px">
          <mj-text mj-class="body-text">
            Hi <strong>Dominic</strong>, <br /><br />
            Morbi ac mauris sed urna ultricies fringilla vitae in mauris. Donec
            tincidunt dictum ex nec semper. Proin dapibus purus velit, tristique
            ultrices dui suscipit ac. Vestibulum accumsan tellus lacus, vel
            venenatis nisi euismod vel.
          </mj-text>
          <mj-text mj-class="body-text" padding-top="20px">
            Aenean a neque non tortor faucibus auctor? <br />
            Sem luctus ex Cras Porta Dapibus Proin pulvinar tortor vel quam
            feugiat.
          </mj-text>
        </mj-column>
      </mj-group>
    </mj-section>
    <!-- End Main Content -->
  </mj-body>
</mjml>
Great! Now let's add in the code for the list which is between the two paragraphs that we just coded. Since we know it would have the same styles for each item on the list, let's create another <mj-class> tag for it and apply to the components:
<mjml>
  <mj-head>
    ...
    <mj-attributes>
      ...
      <mj-class
        name="list-text"
        padding-top="10px"
        font-size="14px"
        line-height="28px"
      />
    </mj-attributes>
  </mj-head>
  <mj-body background-color="#F2F2F2">
    ...
    <!-- Main Content -->
    <mj-section background-color="#FFFFFF">
      <mj-group>
        <mj-column padding="20px">
          ...
          <mj-text mj-class="body-text">
            Hi <strong>Dominic</strong>, <br /><br />
            ...
          </mj-text>
          <mj-text mj-class="list-text">
            1. Aenean ullamcorper mi sed nibh mollis pulvinar?
          </mj-text>
          <mj-text mj-class="list-text">
            2. Curabitur cursus massa eget hendrerit posuere?
          </mj-text>
          <mj-text mj-class="list-text">
            3. Sed tempus accumsan mattis?
          </mj-text>
          <mj-text mj-class="list-text">
            4. Vestibulum finibus id mauris id volutpat?
          </mj-text>
          <mj-text mj-class="list-text">
            5. Nullam vehicula laoreet felis vitae elementum?
          </mj-text>
          <mj-text mj-class="list-text">
            6. Morbi tempor massa eget faucibus molestie?
          </mj-text>
          <mj-text mj-class="body-text" padding-top="20px">
            Aenean a neque non tortor faucibus auctor? <br />
            ...
          </mj-text>
        </mj-column>
      </mj-group>
    </mj-section>
    <!-- End Main Content -->
  </mj-body>
</mjml>
Next, let's create the button below the list, we can use the <mj-button> tag for that. Note that there are some similarities to this button and another button in the following sections in the email template so we should create an <mj-class> for the shared styles then add the styles specific to the button such as padding-top, border and background-color.
<mjml>
  <mj-head>
    ...
    <mj-attributes>
      ...
      <mj-class
        name="btn"
        border-radius="8px"
        inner-padding="7px 103px"
        align="center"
        font-size="14px"
        font-weight="500"
        line-height="22px"
        fluid-on-mobile="true"
      />
    </mj-attributes>
  </mj-head>
  <mj-body background-color="#F2F2F2">
    ...
    <!-- Main Content -->
    <mj-section background-color="#FFFFFF">
      <mj-group>
        <mj-column padding="20px">
          ...
          <mj-text mj-class="body-text" padding-top="20px">
            Aenean a neque non tortor faucibus auctor? <br />
            ...
          </mj-text>
          <mj-button
            href="https://www.example.com/"
            target="_blank"
            mj-class="btn"
            padding-top="20px"
            border="1px solid #343A40"
            background-color="transparent"
            color="#343A40"
          >
            Proin Vestibulum Dui
          </mj-button>
        </mj-column>
      </mj-group>
    </mj-section>
    <!-- End Main Content -->
  </mj-body>
</mjml>
There's two attributes in the btn class that's probably not familiar to you. First one is the inner-padding attribute, which is the padding inside the button. While the padding attribute would apply to the button's container, we can use that for the margin spacing against other components. Then the second one is fluid-on-mobile attribute, if set to "true", will be full width on mobile even if width is set. This makes our button responsive on mobile.
And before we forget it, there's also a link to a text located at the last paragraph which is "Cras Porta Dapibus" in particular. Since the text is inside the <mj-text> tag, we can't use <mj-text> again or any other MJML component. We will need to use regular HTML tags. We can declare styles in MJML and set them as "inline" so that we can style these HTML tags. Let's add in the code along with the class name and styles:
<mjml>
  <mj-head>
    ...
    <mj-style inline="inline">
      .body-anchor-text {
        display: inline;
        color: #007BFF;
        font-size: 14px;
        line-height: 22px;
        text-decoration: none;
        cursor: pointer;
      }
    </mj-style>
  </mj-head>
  ...
</mjml>
<mjml>
  ...
  <mj-body background-color="#F2F2F2">
    ...
    <!-- Main Content -->
    <mj-section background-color="#FFFFFF">
      <mj-group>
        <mj-column padding="20px">
          ...
          <mj-text mj-class="body-text" padding-top="20px">
            Aenean a neque non tortor faucibus auctor? <br />
            Sem luctus ex
            <a
              href="https://www.example.com/"
              target="_blank"
              class="body-anchor-text"
            >
              Cras Porta Dapibus</a
            >
            Proin pulvinar tortor vel quam feugiat.
          </mj-text>
          ...
        </mj-column>
      </mj-group>
    </mj-section>
    <!-- End Main Content -->
  </mj-body>
</mjml>
In case you get confused, just remember for sharing styles, mj-class declared in attributes are used by MJML components and <mj-style inline="inline"> are used by regular HTML tags. What about <mj-style> without the "inline" attribute? It can be used by both MJML components and HTML tags but we'll get to that in the later part of this post.
Alright, once you save the changes, the email template now should look like this:
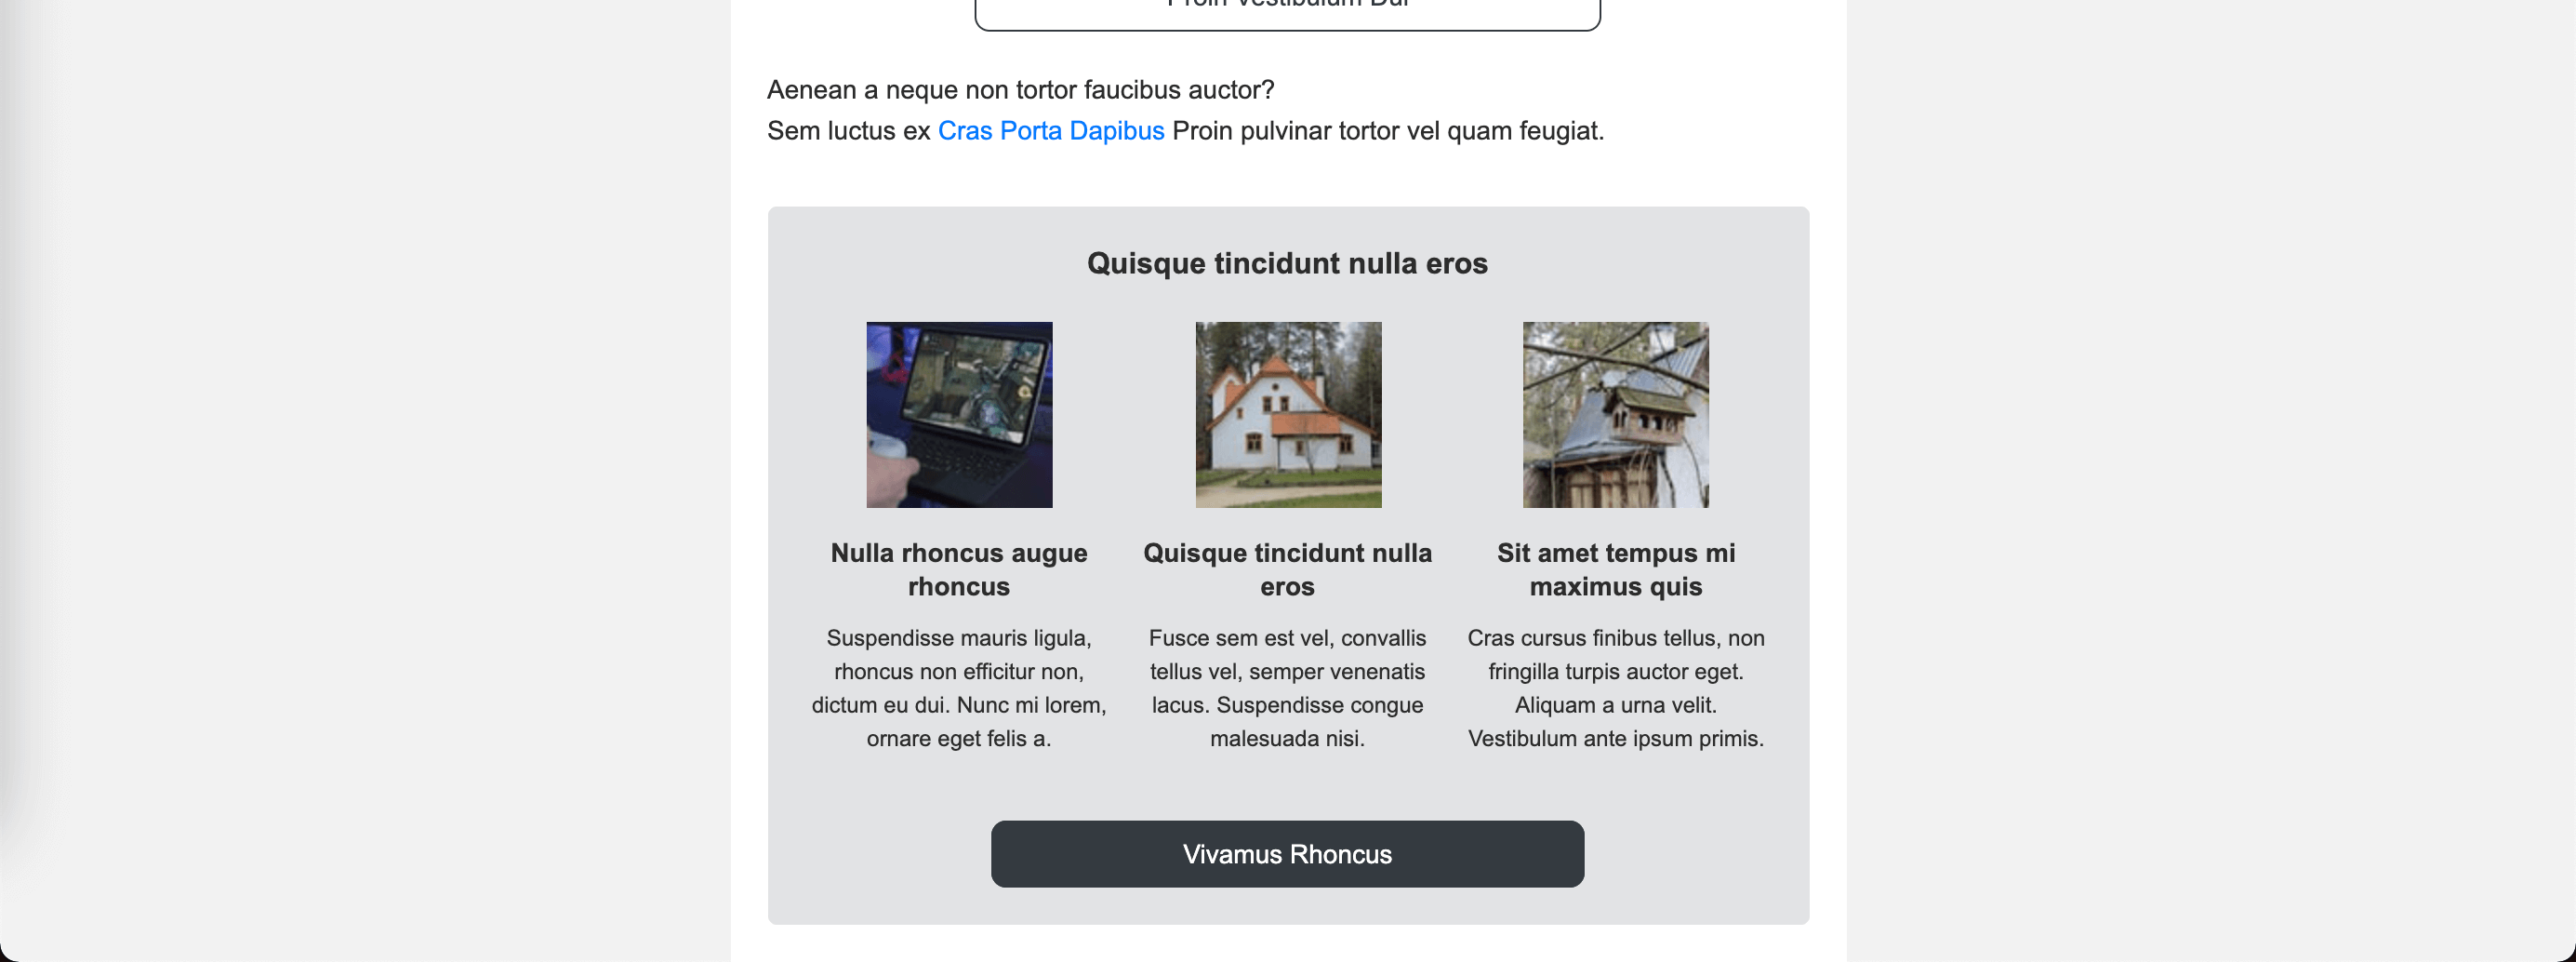
Benefits section
We're already halfway there! Let's move on to the next section. As you can see from the design, this padded section has a white background and inside it is a container that's rounded with a gray background. How do we achieve this? We can use the <mj-wrapper> tag which enables us to wrap multiple sections together. It's especially useful to achieve nested layouts across sections. Let's write the following code below the previous section to construct the containers and the title:
<mjml>
  ...
  <mj-body background-color="#F2F2F2">
    ...
    <!-- Benefits -->
    <mj-wrapper padding="10px 20px 20px" background-color="#FFFFFF">
      <mj-section background-color="#E2E3E5" border-radius="5px 5px 0 0">
        <mj-group>
          <mj-column padding="20px 0">
            <mj-text
              align="center"
              font-size="16px"
              font-weight="700"
              line-height="22px"
            >
              Quisque tincidunt nulla eros
            </mj-text>
          </mj-column>
        </mj-group>
      </mj-section>
    </mj-wrapper>
    <!-- End Benefits -->
  </mj-body>
</mjml>
After that, let's construct the 3 columns below the title.
Before we do some code changes, open the following links (benefit 1, benefit 2, benefit 3) and download the images. Put the images inside the /src/images/ folder.
In mobile, we want them to stack on top of each other so we should not wrap the <mj-column> tag in <mj-group> tag. Let's also use mj-class as these columns share the same styles. Type the following code:
<mjml>
  <mj-head>
    ...
    <mj-attributes>
      <mj-class name="benefit" padding="20px 5px 0 5px" />
      <mj-class
        name="benefit-img"
        align="center"
        width="100px"
        height="100px"
      />
      <mj-class
        name="benefit-title"
        padding-top="15px"
        align="center"
        font-size="14px"
        font-weight="700"
        line-height="18px"
      />
      <mj-class
        name="benefit-content"
        padding-top="10px"
        align="center"
        font-size="12px"
        line-height="18px"
      />
    </mj-attributes>
    ...
  </mj-head>
  <mj-body background-color="#F2F2F2">
    ...
    <!-- Benefits -->
    <mj-wrapper padding="10px 20px 20px" background-color="#FFFFFF">
      ...
      <mj-section background-color="#E2E3E5" padding="0 15px">
        <mj-column mj-class="benefit">
          <mj-image
            mj-class="benefit-img"
            src="images/benefit-1.jpeg"
            alt="playing first-person shooter game on a laptop"
          />
          <mj-text mj-class="benefit-title">
            Nulla rhoncus augue rhoncus
          </mj-text>
          <mj-text mj-class="benefit-content">
            Suspendisse mauris ligula, rhoncus non efficitur non, dictum eu dui.
            Nunc mi lorem, ornare eget felis a.
          </mj-text>
        </mj-column>
        <mj-column mj-class="benefit">
          <mj-image
            mj-class="benefit-img"
            src="images/benefit-2.jpeg"
            alt="a big house in the woods"
          />
          <mj-text mj-class="benefit-title">
            Quisque tincidunt nulla eros
          </mj-text>
          <mj-text mj-class="benefit-content">
            Fusce sem est vel, convallis tellus vel, semper venenatis lacus.
            Suspendisse congue malesuada nisi.
          </mj-text>
        </mj-column>
        <mj-column mj-class="benefit">
          <mj-image
            mj-class="benefit-img"
            src="images/benefit-3.jpeg"
            alt="a bird house outside the house"
          />
          <mj-text mj-class="benefit-title">
            Sit amet tempus mi maximus quis
          </mj-text>
          <mj-text mj-class="benefit-content">
            Cras cursus finibus tellus, non fringilla turpis auctor eget.
            Aliquam a urna velit. Vestibulum ante ipsum primis.
          </mj-text>
        </mj-column>
      </mj-section>
    </mj-wrapper>
    <!-- End Benefits -->
  </mj-body>
</mjml>
And to finish off this section, let's add in the code for the button below the section of the columns. Remember we created an mj-class called btn specifically to share the styles with this button, so let's use that and also apply the specific styles:
<mjml>
  ...
  <mj-body background-color="#F2F2F2">
    ...
    <!-- Benefits -->
    <mj-wrapper padding="10px 20px 20px" background-color="#FFFFFF">
      ...
      <mj-section background-color="#E2E3E5" border-radius="0 0 5px 5px">
        <mj-group>
          <mj-column>
            <mj-button
              href="https://www.example.com/"
              target="_blank"
              mj-class="btn"
              padding="35px 15px 20px"
              background-color="#343A40"
              color="#FFFFFF"
            >
              Vivamus Rhoncus
            </mj-button>
          </mj-column>
        </mj-group>
      </mj-section>
    </mj-wrapper>
    <!-- End Benefits -->
  </mj-body>
</mjml>
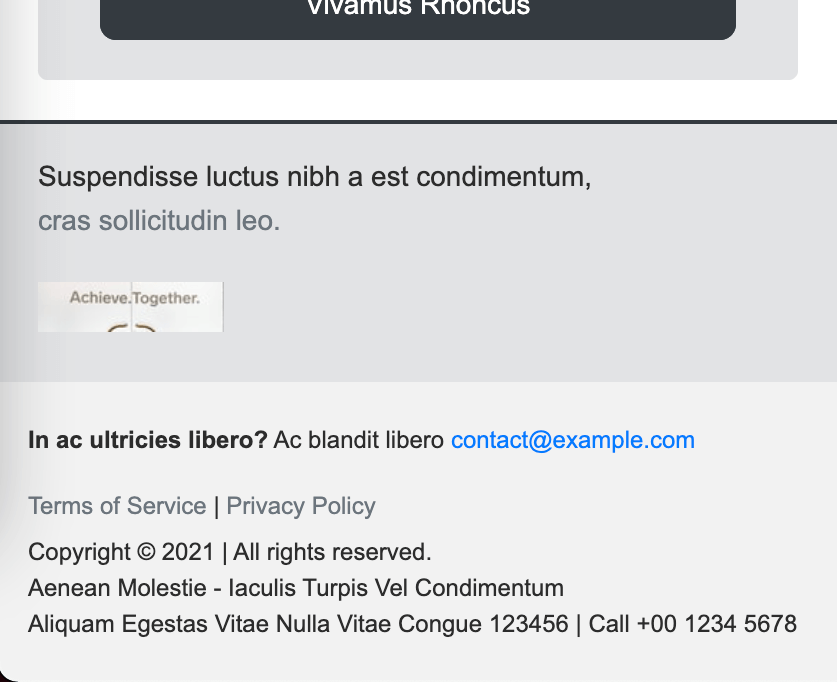
Once you save the changes, the email template now should look like this:
Company Footer section
Alright, we've done the difficult sections, the next sections would be easy now. Let's write the following code below:
<mjml>
  <mj-head>
    ...
    <mj-style inline="inline">
      ...
      .text-blue {
        color: #007BFF;
      }
    </mj-style>
  </mj-head>
  ...
</mjml>
<mjml>
  ...
  <mj-body background-color="#F2F2F2">
    ...
    <!-- Company Footer -->
    <mj-section
      border-top="2px solid #343A40"
      background-color="#E2E3E5"
      padding="15px 20px"
    >
      <mj-column>
        <mj-text mj-class="body-text">
          Suspendisse luctus nibh a est condimentum, <br />
          <span class="text-gray">cras sollicitudin leo.</span>
        </mj-text>
      </mj-column>
      <mj-column>
        <mj-image
          href="https://www.example.com/"
          target="_blank"
          src="images/logo.jpeg"
          alt="logo"
          width="93px"
          height="25px"
          align="right"
          padding="10px 0"
        />
      </mj-column>
    </mj-section>
    <!-- End Company Footer -->
  </mj-body>
</mjml>
Footer section
And to finish off the last piece of our email template, let's write the code for the final section:
<mjml>
  <mj-head>
    <mj-attributes>
      ...
      <mj-class name="footer-text" font-size="12px" line-height="18px" />
    </mj-attributes>
    ...
  </mj-head>
  ...
</mjml>
<mjml>
  <mj-head>
    ...
    <mj-style inline="inline">
      ...
      .footer-anchor-text {
        display: inline;
        color: #2C2C2C;
        font-size: 12px;
        line-height: 18px;
        text-decoration: none;
        cursor: pointer;
      }

      .text-blue {
        color: #007BFF;
      }
    </mj-style>
  </mj-head>
  ...
</mjml>
<mjml>
  ...
  <mj-body background-color="#F2F2F2">
    ...
    <!-- Footer -->
    <mj-section>
      <mj-column padding="20px 0">
        <mj-text mj-class="footer-text">
          <strong>In ac ultricies libero?</strong> Ac blandit libero
          <a
            href="mailto:contact@example.com"
            class="footer-anchor-text text-blue"
          >
            contact@example.com</a
          >
        </mj-text>
        <mj-text mj-class="footer-text" padding-top="15px">
          <a
            href="https://www.example.com/"
            target="_blank"
            class="footer-anchor-text text-gray"
          >
            Terms of Service</a
          >
          |
          <a
            href="https://www.example.com/"
            target="_blank"
            class="footer-anchor-text text-gray"
          >
            Privacy Policy</a
          >
        </mj-text>
        <mj-text mj-class="footer-text" padding-top="5px">
          Copyright © 2021 | All rights reserved.<br />
          Aenean Molestie - Iaculis Turpis Vel Condimentum<br />
          Aliquam Egestas Vitae Nulla Vitae Congue 123456 | Call
          <a href="tel:0012345678" class="footer-anchor-text"> +00 1234 5678</a>
        </mj-text>
      </mj-column>
    </mj-section>
    <!-- End Footer -->
  </mj-body>
</mjml>
Our template should now look like what we wanted to accomplish from the start:

Mobile styles
But wait, there's more! Let's try to see how the mobile view is looking right now. All is well until you reach the footer section:
The alignment of the logo should be on the left and there should be some padding for the bottom section. This is where <mj-style> without the "inline" attribute comes in and we can write the media queries inside it just like how you override styles in HTML on certain breakpoints. We will have to use the !important rule to override the inline styles of the elements.
<mjml>
  <mj-head>
    ...
    <mj-style inline="inline=">
      ...
    </mj-style>
    <mj-style>
      @media only screen and (max-width: 599px) {
        .company-footer-img {
          padding-top: 20px !important;
          text-align: left !important;
        }

        .footer {
          padding-right: 15px !important;
          padding-left: 15px !important;
        }
      }
    </mj-style>
  </mj-head>
  ...
</mjml>
<mjml>
  ...
  <mj-body background-color="#F2F2F2">
    ...
    <!-- Company Footer -->
    <mj-section
      border-top="2px solid #343A40"
      background-color="#E2E3E5"
      padding="15px 20px"
    >
      ...
      <mj-column>
        <mj-image
          href="https://www.example.com/"
          target="_blank"
          css-class="company-footer-img"
          src="images/logo.jpeg"
          alt="logo"
          width="93px"
          height="25px"
          align="right"
          padding="10px 0"
        />
      </mj-column>
    </mj-section>
    ...
    <!-- End Company Footer -->

    <!-- Footer -->
    <mj-section>
      <mj-column css-class="footer" padding="20px 0"> ... </mj-column>
    </mj-section>
    <!-- End Footer -->
  </mj-body>
</mjml>
It looks good now!
Hover styles
The <mj-style> without the "inline" attribute is also useful for :hover styles. To finish off our email template, let's add in the hover styles for our buttons and anchor tags:
<mjml>
  <mj-head>
    ...
    <mj-style>
      .body-anchor-text:hover,
      .footer-anchor-text:hover {
        text-decoration: underline !important;
        cursor: pointer;
      }

      .btn-outline-dark a:hover,
      .btn-dark a:hover {
        color: #FFFFFF !important;
        background-color: #212529 !important;
        border-color: #212529 !important;
        cursor: pointer;
      }

      .btn-outline-dark td:hover,
      .btn-dark td:hover {
        background-color: #212529 !important;
      }

      @media only screen and (max-width: 599px) {
        ...
      }
    </mj-style>
  </mj-head>
  ...
</mjml>
...
Then, you would need to add css-class for the buttons because they are MJML components:
<mjml>
  ...
  <mj-body background-color="#F2F2F2">
    ...
    <!-- Main Content -->
    <mj-section background-color="#FFFFFF">
      <mj-group>
        <mj-column padding="20px">
          ...
          <mj-text mj-class="body-text" padding-top="20px">
            Aenean a neque non tortor faucibus auctor? <br />
            ...
          </mj-text>
          <mj-button
            href="https://www.example.com/"
            target="_blank"
            mj-class="btn"
            padding-top="20px"
            border="1px solid #343A40"
            background-color="transparent"
            color="#343A40"
            css-class="btn-outline-dark"
          >
            Proin Vestibulum Dui
          </mj-button>
        </mj-column>
      </mj-group>
    </mj-section>
    <!-- End Main Content -->
    ...
    <!-- Benefits -->
    <mj-wrapper padding="10px 20px 20px" background-color="#FFFFFF">
      ...
      <mj-section background-color="#E2E3E5" border-radius="0 0 5px 5px">
        <mj-group>
          <mj-column>
            <mj-button
              href="https://www.example.com/"
              target="_blank"
              mj-class="btn"
              padding="35px 15px 20px"
              background-color="#343A40"
              color="#FFFFFF"
              css-class="btn-dark"
            >
              Vivamus Rhoncus
            </mj-button>
          </mj-column>
        </mj-group>
      </mj-section>
    </mj-wrapper>
    <!-- End Benefits -->
    ...
  </mj-body>
</mjml>
And we are done! You've just built an email template with MJML framework with just a few lines of code - 296 to be exact. Just compare that amount of code against the generated index.html, it's half the amount of code and definitely much cleaner and easier to maintain than when you build the email template in regular HTML. And we didn't have to struggle much with regards to responsiveness, MJML handles most of it for us.
If you need the final code of this template, this is the link to the GitHub repository.
And in case you want to build more email templates and practice, you can check out some of my past email templates which I recently just migrated to MJML framework:
- AXA Email Templates (Smart Travel I, Smart Travel II, Mother's Day, Shield, SmartHome, Singtel Partnership, September Promo)
- M1 Email Templates (Passport I, Passport II, Passport III, Passport IV)
- Hashtag Interactive Welcome Email Template
The codes of these templates are available on my GitHub.
I hope this post was insightful and gave you all the pointers you need when building email templates with MJML framework. You can also check their official documentation here to further your knowledge. This framework deserves to be shared, so please do!